![]() +44 (0)1484 90 50 13
+44 (0)1484 90 50 13
Support
Browse our range of help documentation and guides.
![]() +44 (0)1484 90 50 13
+44 (0)1484 90 50 13
Browse our range of help documentation and guides.
Looking for an instant answer to a question? Chances are we've been asked it before and it's answered here. Just dive into a category your question relates to below.
Provided you have obtained the correct permission from your recipients, it's really simple to import a list of subscribers into your account. It can be done using a number of file formats, including compressed files for really big lists.
To import new subscribers from a file, you need a 'subscriber list' ready to add them to. If you don't have a list ready, first follow these instructions:
File formats you can import into your account include:
Note If your list of subscribers contains non-English characters, ensure the file is saved using UTF-8 encoding before you import it. Most text editors (such as Notepad and TextEdit) offer encoding options when you save the file.
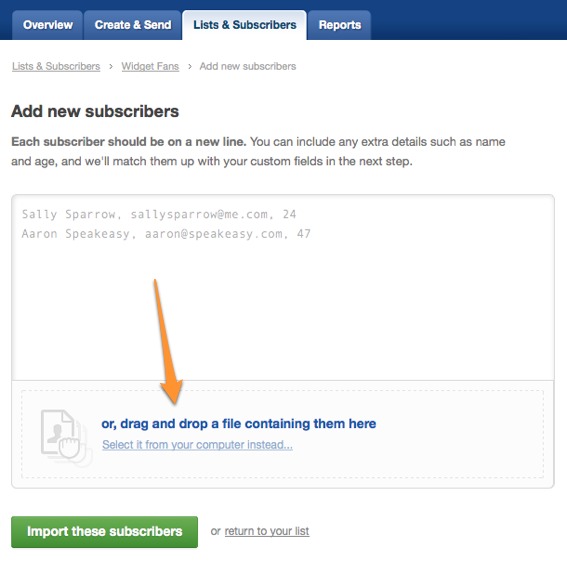
Note Internet Explorer browsers don't support our file "drag and drop" functionality. If you're using IE, you'll only see the option to upload a file by "selecting it from your computer".
Now your successfully imported subscribers are active on your list, and will be sent any future campaigns you send to that list. They will not be emailed any confirmation that they were added, so you can safely import subscribers who have already opted in from a different system.
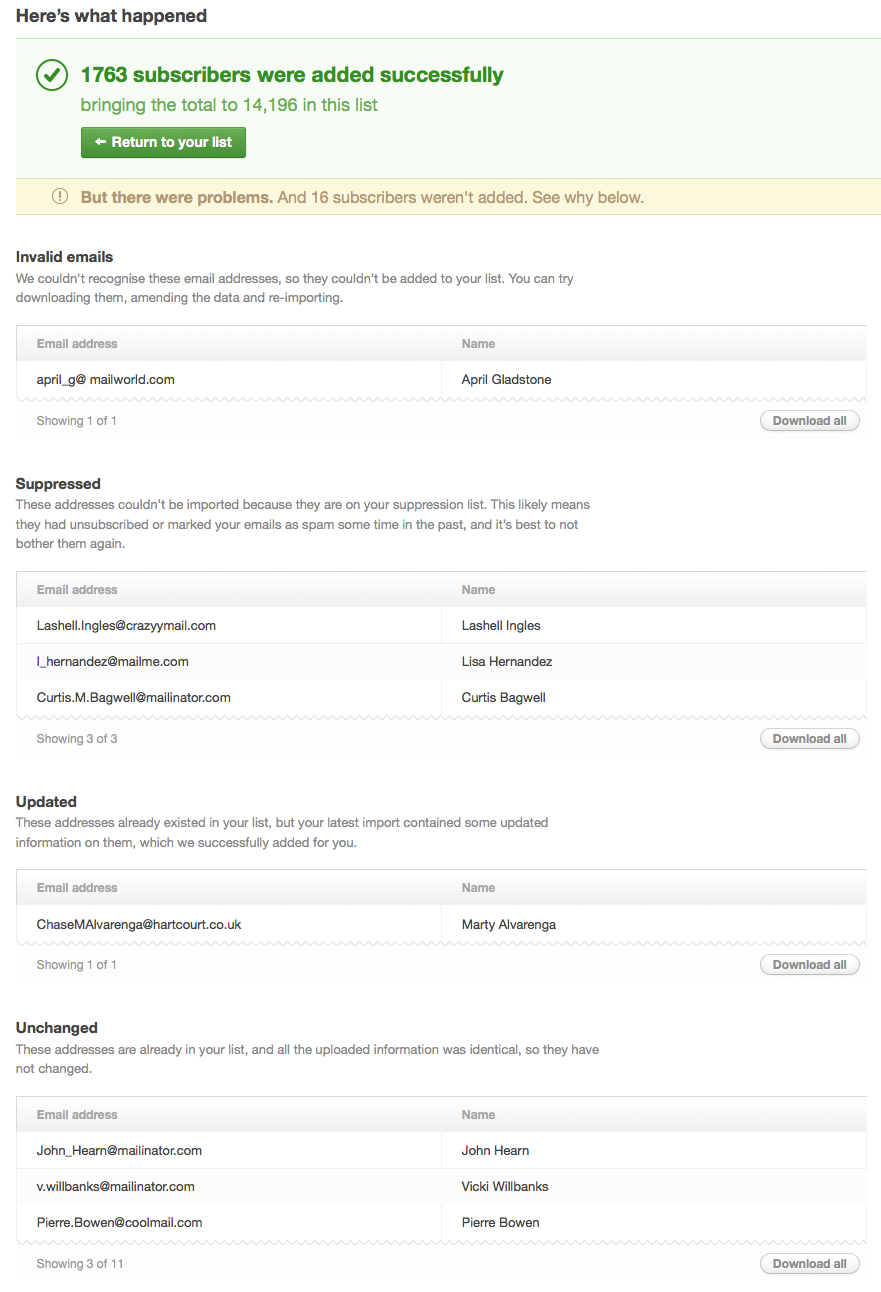
If there were any problems with the import, you'll see an 'import report' screen with details on what happened.
This report provides specific detail about why individual subscribers weren't sucessfully imported. Alongside each reason (e.g. invalid email address, already on the list, etc.) is a button to Download all so you can easily edit and re-import, if necessary.
The following screen shot shows some of the 'import problems' you could encounter, and below that is the full list and descriptions.
Important Your subscribers must adhere to our strict permission policy. Adding and importing names that go against these rules, and our Anti-Spam Policy, may result in the immediate termination of your account.
If the file you're importing contains the same email address more than once, the software will detect it and only import one record for the email address.
When this happens an 'import report' is generated after the file has been uploaded (which remains available for 10 days). Under the heading "Duplicates" (see below) you'll see one or more examples of the duplicate emails and a Download all button to export them as a CSV file.
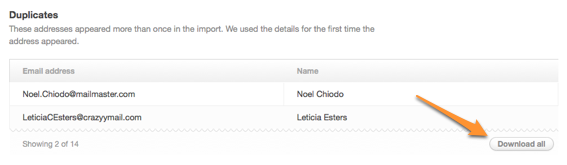
You can of course have the same email address in two separate lists in your account. If you send a single campaign to more than one list, and the same address is on multiple lists, those duplicates will be identified so each email address only gets one email.
You just need to format the data in your file so the custom field values have a "double pipe" separator - || - between them.
Here's how data might look like when prepared for import in a comma separated values (.csv) text file:
Name, Email, Interests, Country
Simon Says, simon@says.com, Surfing||Movies||Reading, Australia
The multiple value data in the example above is: Surfing||Movies||Reading. Everything else stays the same, separated by a comma.
Use the same formatting if your subscriber details are in a spread sheet program. File formats you can import include Excel documents (.xls and .xlsx ) so just format your multiple value data as shown below (in column C) and you're good to go.

Note We use the same "double pipe" formatting for subscriber data you export as well, so it's easy to make any changes you want and re-import the file back into the same or other subscriber lists.
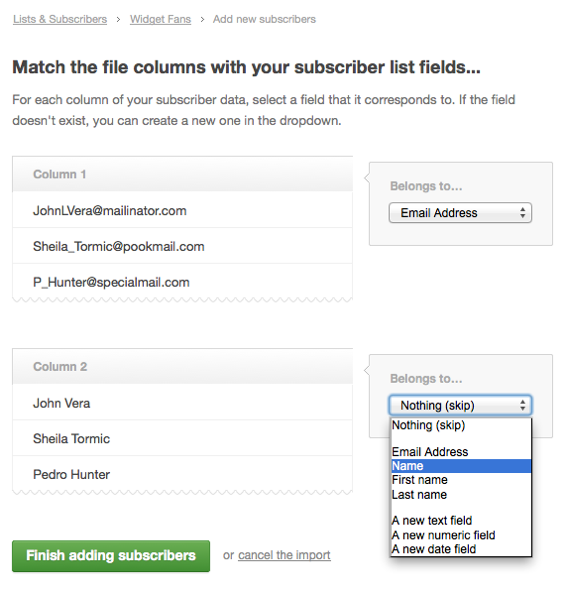
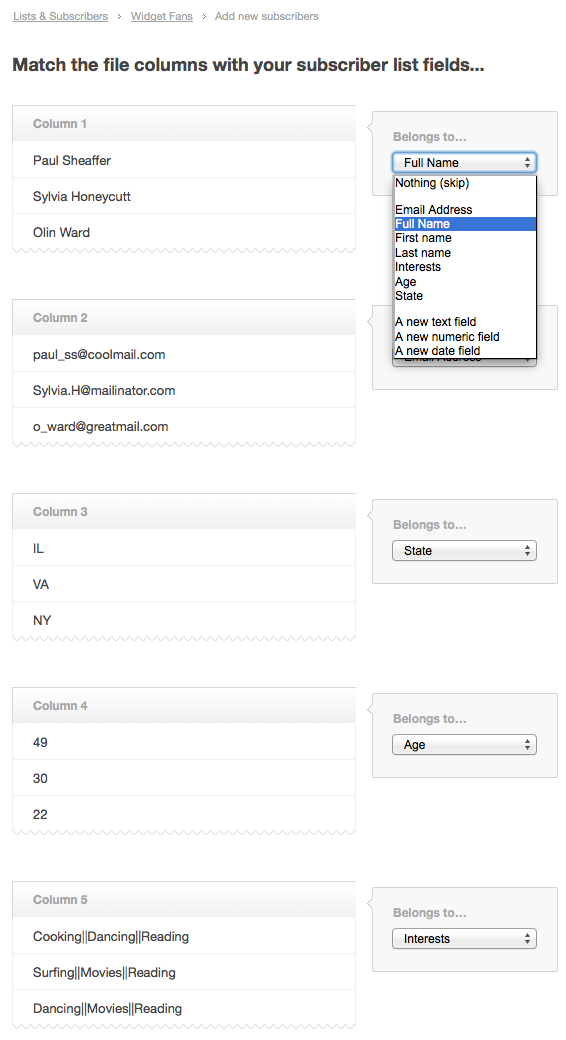
Yes, you can. When the file has been imported you'll be prompted to match up the columns from your file with the fields for your subscriber list.
As shown below, the Belongs to... drop-down menu is populated with default fields (name and email address) and any custom fields you have setup for the list which, in this example, are: Interests, Age, State.
Yes, it's just a matter of exporting the contacts from your external data management system (e.g. your CRM software or event booking system) then importing the subscribers as a file.
Yes, so long as you can export the data to one of the following file formats:
If your file contains multiple value data, check out our article on how to format it correctly. When your file is ready, follow these instructions to import the file into your account.
Important Your subscribers must adhere to our strict permission policy. Adding and importing names that go against these rules, and our Anti-Spam Policy, may result in the immediate termination of your account.
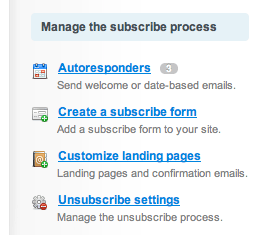
Adding a subscribe form to your web site is a great way to attract new subscribers and it couldn't be easier.
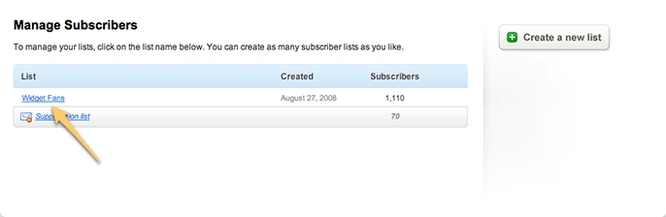
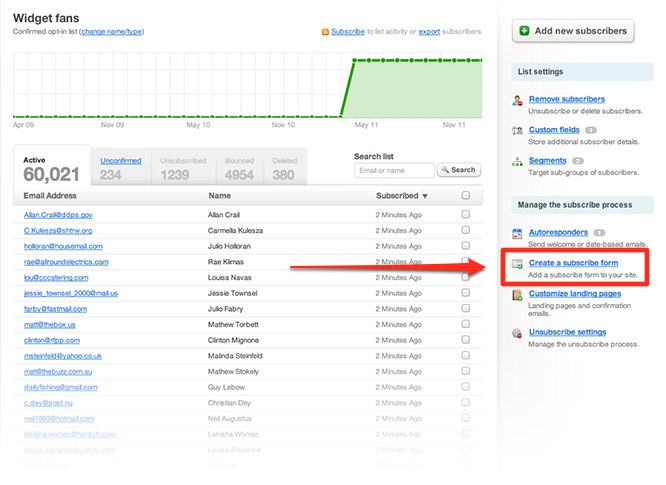
Simply click on the the list you would like to create a subscribe form for in the 'Lists & Subscribers' section...
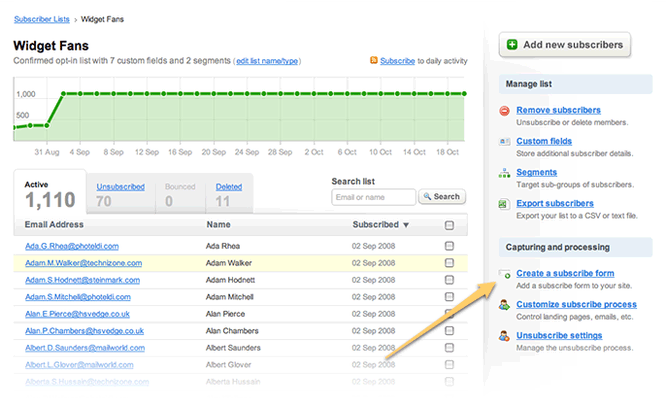
Then, click the Create a subscribe form link in the right hand column, under "Capturing and processing".
Next, choose which fields you'd like to include on your web form and click the "Generate the code" button.
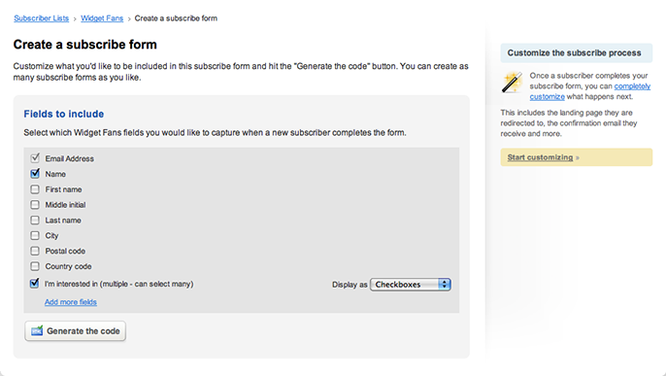
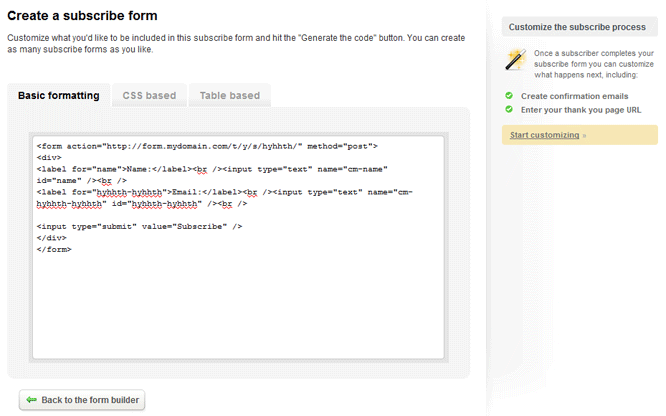
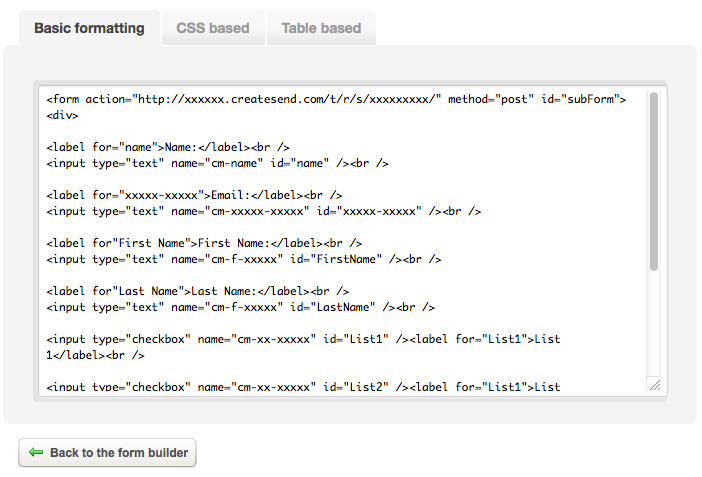
Finally, copy the supplied HTML code and paste it into the HTML code of the web page you are adding the form to. We've provided a few options for you depending on the formatting you prefer, including basic, CSS and table formatting. You can format the form in any way you like, just remember you can't change the action of the form or the name of the form elements.
We also feature a number of simple subscribe form options you can use to extend the functionality of your subscribe form.
If this is a double opt-in subscriber list, you have a number of further customization options, including:
If you would like to, you can manually change the form action to use https:// instead of http:// and it will keep working normally.
If you're having issues adding the from to your site call us on +44 (0)1484 90 50 13 and our expert team of developers can help you get set up.
There is a big difference between having access to an email list, and having permission to send them all email. By using this software you agree to follow our specific permission policy, and in this page we'll discuss some of the common situations where permission is gathered (or not!).
While the CAN-SPAM laws are important, we don't feel they go far enough. Our definition of spam goes beyond the laws in most countries; Spam is any email you send to someone who hasn't given you their direct permission to contact them on the topic of the email.
Here are a few of the most frequent questions about whether a list can be considered permission-based. Ultimately it comes down to being clear, and meeting the expectations of the subscribers. We can't cover every possible situation, but often you'll be able to extrapolate from these examples.
No chance, sorry. No matter what the list broker claims, or how legal it is, you cannot use any kind of third party list with this software. There is no situation where it would be allowed, and it doesn't matter if you didn't have to pay for it, it still doesn't count as permission in this context.
That goes for industry specific lists too, like Adbase for photographers. A purchased list is a purchased list.
Perfect, that's clear, direct permission and you are good to go. Just make sure you email people regularly (don't leave it months before contacting them) and that you only send them what you promised you would. They probably didn't sign up to hear how to vote for your nephew on 'American Idol'.
This is very common, but it doesn't count as permission. Those people may well have agreed to hear from every vendor as part of their entry, but it isn't explicit, direct permission to your company. It is not allowed to be used with this software, even if the tradeshow organiser tells you it is fine.
Much better! Those people know who you are, and have shown their interest in hearing specifically from you. Don't wait too long after the show to email them though, and make sure to mention their visit to your booth in the first email.
Permission is like bread, it starts out great but goes stale quickly. If you haven't emailed these people in the last year or so, they've probably forgotten about you, and you don't really know if they are still interested. If it's been between 6 months and a year, you should start with a simple reminder email, asking them to unsubscribe if they are no longer interested.
That's a good start, and if they are current or recent customers (within the last 2 years at the longest) then you are safe to assume an existing relationship.If it's been longer than that and you've not been emailing them regularly, then it is a no go zone. Permission does not last forever - use it or lose it.
Unfortunately, the answer is no. Our deliverability and sender reputation are maintained in part by not allowing gambling, adult or pharmaceutical emails at all, even from totally legitimate businesses.
This is a special case - although they are customers, eBay shoppers just don't expect to get email from the people they buy, their permission really is just for eBay to contact them.
So unless these people signed up directly for your newsletter, it isn't allowed to be used here.
That's good, but it isn't explicit opt-in. If they checked a clear box agreeing to receive your newsletter, then go for it. However, hiding a line in your terms and conditions or privacy policy about receiving email, and making people agree to that is not considered opting-in.
We all know that most people never read those documents, so put the opt-in right on the sign up page instead, or you don't truly have their permission.
If your employers are paying for your services, that's fine. However, candidates have not necessarily agreed to be added to your general mailing list (as opposed to being contacted about specific roles).
You'd need to have their direct permission before emailing newsletters to them, and that means a clear opt-in verbally or electronically, not just a line somewhere in their contract or in the terms of your site. If you have that explicit permission, then you are good to go.
This is another situation where the permission just isn't direct. Even when the organization itself says it is fine to be used, it doesn't qualify as direct opt-in for this software, and so you can't use it.
If you've talked to individuals and they have given you their direct permission, that's still fine.
Danger! Competition lists like this often cause a lot of spam complaints. If people gave their details just to win a prize, then the only thing you could email them about is to let them know they won the prize, or perhaps a one off email to announce the winner.
You don't have permission to market to them on any other topic. Hiding a sentence about "you agree to be emailed forever more" in 8pt font in the terms and conditions just does not honestly count as permission. If on the other hand you have a 'sign up for our email newsletter' page or sheet, and offer a prize, then people are much more aware of what they are signing up to.
This is almost always not ok. Permission isn't permanent and endlessly flexible - those people gave you permission in a particular context, relating to that company and its product or service. They did not sign up to hear about other companies, even if you are involved in them.
Sending in a question or comment isn't the same thing as opt-in permission. Even if your form says 'send me more information', that doesn't mean you can add them to a marketing list, it just means you can send them specific information as requested.
Unless your contact form clearly lets people choose to also receive your newsletter, they have not given you permission.
It's great you know so many people! However, you do still need to have their direct permission. That could be as simple as verbally asking them if it is ok to add them to your newsletter list. They probably won't mind even if you don't ask, but it still is not opt-in, and still not allowed.
This one can be tricky, because Facebook Connect can be setup to ask for permission to email. However, it is permission for the Facebook application itself to send them email, not for the company to add them to a newsletter or other list. We'd suggest a separate opt-in checkbox instead.
That's an indication of interest, for sure, but it is not direct opt-in. They might want to have some connection to you but you can't assume they want to be on your email list unless they actually ask.
We employ a very strict anti-spam policy that is supported by a strong permission policy. Please review the policy below before attempting to import your list into your account.
We allow you to import a list of email addresses for use in your account. These email addresses MUST BE opt-in email addresses.
The following types of email addresses are NOT appropriate:
Adding and importing names that go against these rules and our Anti-Spam Policy may result in the immediate termination of your account. Be sure to review our guidelines and the Permission Confirmation Checklist before importing addresses into your account.
If your site uses Tumblr, you have the option of including a subscribe form in your tumblog's site template (so it appears on every page) or including your subscribe form on a stand-alone page separated from your site's posts - or you could set up both. Either way, this is what you'll need to do:
Head into your account and go to the subscriber list you wish to create a subscribe form for and click the "Create a subscribe form" link on the right.
Choose which fields you wish to include and click the "Generate the code" button.

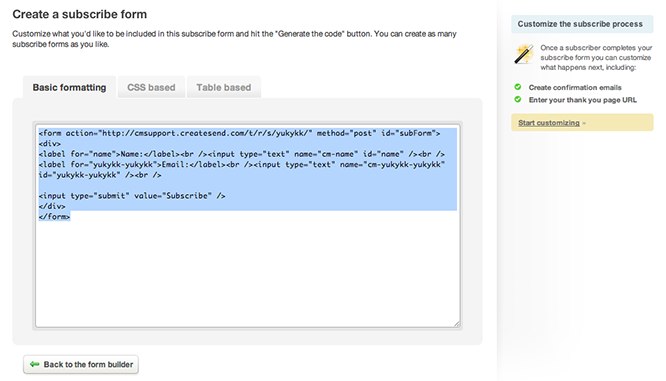
Select the code that is generated and copy it to your clipboard.
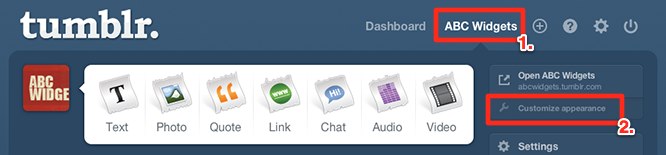
Login to your Tumblr account, select which tumblog you want to add the subscribe form to (1) and click "Customize appearance" (2).
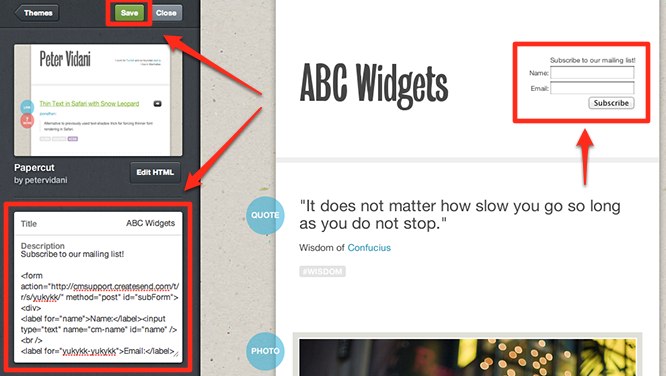
Paste your code into the "Description" box in the left column and click "Save". A preview of your theme including your new subscribe form will appear to the right. Your form will appear in the about section of your tumblog, so depending on your theme, it can vary where the form will actually be located.
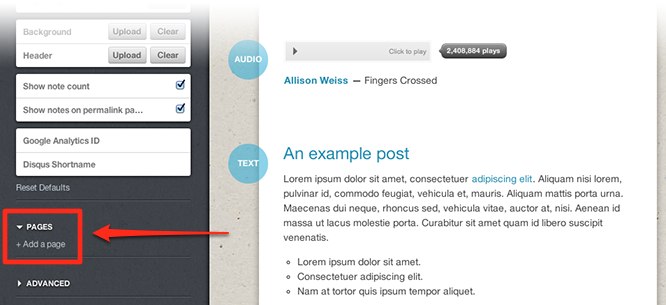
You will need to follow the steps above, navigating to the "Customize appearance" area, but then scroll to the bottom of the left column where you will see a "PAGES" header. Click this to reveal and click "+ Add a page" link.
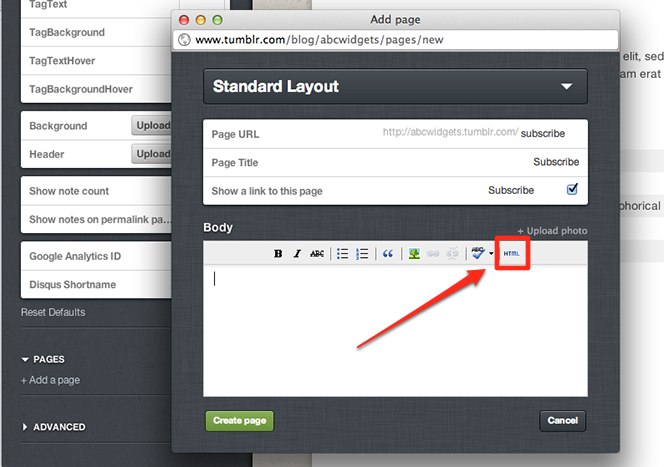
A popup window will appear where you can enter a URL and title for your subscribe page. Be sure to tick the "Show a link to this page" option. The page title will appear in your site's navigation. Again, according to your theme, the location of this can vary where it actually appears on your site. Next, click the "HTML" link in the WYSIWYG editor's toolbar.
Another popup window will appear where you can enter the source code for the content of this page. Tumblr automatically removes form elements, so you will need to host your subscribe form externally and embed it within an iframe. Paste in your iframe code and click "Update".

Save the page and preview your tumblog. You will now have a subscribe page accessible from your site's menu.
When you create a subscribe form, you can choose to add opt-in checkboxes (at the bottom of the form) for the client's other email lists. But if you prefer a drop-down list, we'll show you how to adjust the code that's generated to have that instead.
Important Before you start, note that recipients will only be able to choose one of the list options from the drop-down. If you need/want people to be able to select two or more, stick with checkboxes.
Go to the Lists & Subscribers tab for the relevant Client, then select the list you want to generate a subscribe form for.
Click Create a subscribe form in the right sidebar and, under "Add an opt-in checkbox for other lists", select the additional lists you want included in the drop-down. Then click Generate the code to produce something like this:
Copy the generated code and put it aside for a second, we'll come back to it.
First, you need to include the Javascript shown below inside the <head> tags of the web page you want your subscribe form to appear on. When added, the beginning of your HTML should look like this:
<html xmlns="http://www.w3.org/1999/xhtml">

                                         <head>

                                         <title>Subscribe Form</title>

                                         <script type="text/javascript">
                                         function changeHiddenInput ()
                                         {
                                         var objDropDown = document.getElementById("dropdown");
                                         var objHidden = document.getElementById("hiddenInput");
                                         objHidden.name = objDropDown.value;
                                         }
                                         </script>

</head>Inside the form, you also need to insert a hidden field so the value the subscriber chooses from the drop-down gets passed to the hidden field when the form is submitted. It should appear as follows:
<input type="hidden" name="hiddenInput" id="hiddenInput" value="On" />Now you need to add the name="" codes on those pre-generated checkbox input fields as values on the <option> fields within the drop-down list.
So where your subscribe page generates this:
<input type="checkbox" name="cm-xx-xxxxx" id="List1" />You need to take the "cm-xx-xxxxx" part, and add it as a value in the drop-down list, as shown below:
<select id="dropdown" name="dropdown" onChange="changeHiddenInput();">
                                            <option value="cm-xx-xxxxx">List 1</option>
                                         </select>
The end result should look similar to this:
                                        <form action="http://xxxxxx.createsend.com/t/r/s/xxxxxxxxx/" method="post" id="subForm">
										<label for="name">Name</label><br /><input type="text" name="cm-name" id="name" /><br />
                                        <label for="olrlhi-olrlhi">Email</label><br />
                                        <input type="text" name="cm-xx-xxxxx" id="olrlhi-olrlhi" /><br />
                                        <select id="dropdown" name="dropdown" onChange="changeHiddenInput();">  <option value="cm-xx-xxxxx>List 1</option>  <option value="cm-xx-xxxxx">List 2</option></select><input type="hidden" name="hiddenInput" id="hiddenInput" value="On" />
                                        <input type="submit" value="Subscribe" />

</form>When sending out a campaign, we require that you include an unsubscribe link, which is a way your recipients can opt-out of your email list with a single click. When they click this unsubscribe link, they will be removed from the appropriate list in your account and then will be displayed a web page explaining to them that they have successfully been unsubscribed from the list.
By adding an unsubscribe page to your subscriber lists, the system will automatically redirect to this customized page after the subscriber has been removed. The unsubscribe confirmation page is usually a page on your site which matches your existing look and feel. You can set your own unsubscribe page by visiting the "Unsubscribe settings" for any given list.
And if you don’t want to create your own unsubscribe page, you don’t have to. We will simply redirect the user to a generic unsubscribe page letting them know they have successfully been removed from the list.
Every email campaign you send has to have an instant unsubscribe link (if you don't add one yourself, one will be added automatically for you). This help document explains how that unsubscribe link works, and what happens to people who have unsubscribed.
In your HTML page or template, and in the plain text version, there is a special unsubscribe tag. When you send your campaign, each subscriber gets their own individual copy of your email, and that tag is replaced with a unique link for each subscriber. It is different for each person, and also for each campaign, so you can't just copy an old unsubscribe link and place it into your next email.
The unsubscribe link sends the person who clicked it off to our software, where the click is recorded, and the software works out which subscriber, list and campaign it is associated with.
That person is immediately changed from active subscriber to unsubscribed in that list, no need for you to manually do anything at all. In the campaign report, that subscriber will now appear as having unsubscribed.
Suppression list, and unsubscribe settings
By default, unsubscribing from a list will also unsubscribe that address from all other lists in the same account. So if the address is on your 'customers' list and your 'newsletter' list, they will not be an active subscriber in either one.
Unsubscribing also adds that address to the suppression list, which will then prevent you from accidentally importing them into your account after they have unsubscribed.
To change the default behavior, so that clicking unsubscribe will only remove the subscriber from the specific list that campaign we sent to, you can go to 'Unsubscribe settings' and use the radio buttons to change your choice.
Somebody wants to sign up again?
The suppression list only prevents you (the list owner) from reimporting an address, but the address owner can resubscribe at any time through your normal sign up forms.
My campaign is sent to more than one list?
In that case, the unsubscribe link will remove them from all of the lists they are on, regardless of the 'unsubscribe settings for those lists. That's because the software can't know which list they intended to unsubscribe from.
Sometimes it can be useful to move an unsubscribed email address back to subscribed or active status. Here's how you can do this from within your account.
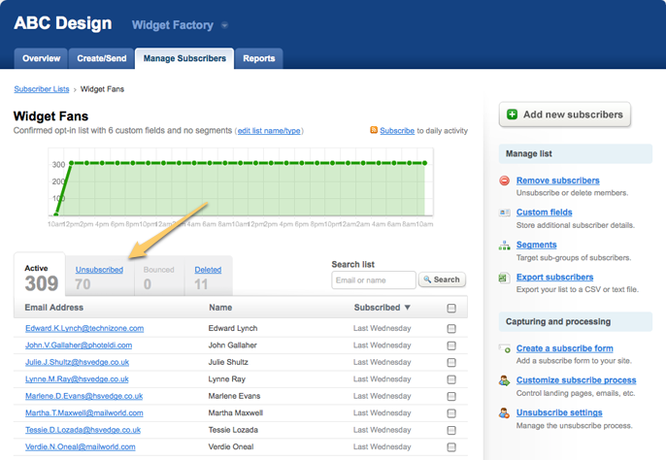
From your list management page, click the "Unsubscribed" link.
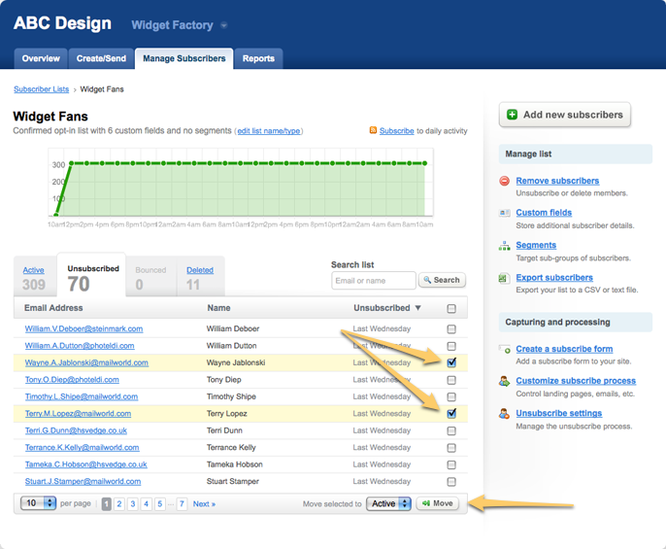
Now, choose which subscribers you wish to move back to "active" status and click "Move".
There are two primary reasons why your unsubscribe rate may be high.
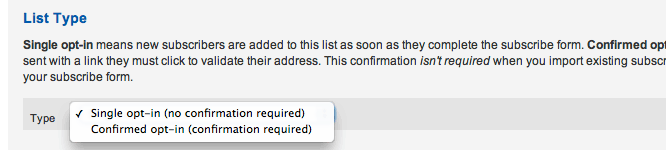
For every subscriber list, you have the option of making it either a single opt-in or confirmed opt-in. The type of list you should choose depends on the quality of the list you require as well as the quantity of subscribers you are hoping to attract.
Single Opt-In
Single opt-in means that as soon as a subscriber completes a subscriber form, they are automatically added to that Subscriber List. No additional confirmation or step is required.
Confirmed Opt-In (sometimes known as double opt in)
Unlike single opt-in, confirmed opt in requires your subscribers to validate their email address before being added to your subscriber list. When a new subscriber completes the subscribe form on a website, an email is immediately sent to the address they provided. This email contains a verification link which the recipient clicks on to confirm that they own the address. Once the link has been clicked, that email address is added to your list.
If the link is not clicked, then the subscriber is not added. If they later fill in the subscribe form again, they will be sent another verification email.
The type of list you select completely depends on your requirements. Listed below are some of the advantages and disadvantages of using confirmed opt-in Subscriber Lists:
Advantages
Disadvantages
For all of your subscriber lists, you can completely customize the single and confirmed opt-in process by entering your own URL for custom confirmation pages and also editing the contents of the verification email.
You can change the type of list at any time. Go to your 'Manage Subscribers' tab, and click through to the list you want to work with.
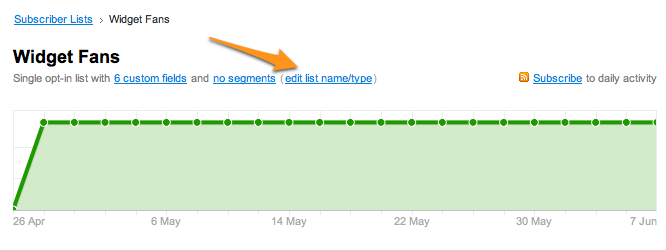
Click the 'edit list name/type' link to access the page where you can change from single to confirmed opt-in, or back the other way.
When you change a list from single opt-in to confirmed opt-in, everyone who is already active will just be considered a confirmed opt-in subscriber. So there won't be any email sent out to them.
No, unfortunately you can't. The whole point of the confirmed opt-in list is that those people have to take the action themselves. It is normal to have up to 30% of people not confirm their opt-in, because they changed their mind, forgot, or had problems with the process.
If they ever add themselves to your sign up form again, they will be sent another confirmation email, so that is one option for people who forgot or had problems confirming.
Similar to the above question, it isn't possible to delete these people while they are in the unconfirmed state. However, they won't receive any emails, so they aren't going to cause any real issues for you.
No, you should generally not delete them from your account. The "open" count is based on a blank image that gets displayed when the subscriber opens your email. In some cases, the image does not get display yet they still received your email.
Some reasons why the "open" might not register:
If you would like to email people who are recording opens, you could use segmenting to create a sub-list of subscribers who have opened one or more of your recent campaigns. Find out more about segmenting in our help topic. You will want to create a rule like "Opened <campaign name> OR Opened <campaign name>" and go back as many campaigns as you like.
Alternatively, create the opposite segment for "Did Not Open <campaign name>" to generate a list of people who have not recorded opens or clicks. Then you could manually review them, or export the segment and remove them from your list.
When you set up a new subscriber list, people who join it or leave it will by default be shown a very basic unbranded confirmation message, to let them know that their action has been received.
Those are the same for every list, and it isn't possible to edit them at all. However, if you'd like to have more control, you can instead have people redirected transparently to your own site, where you can show your own confirmation pages.
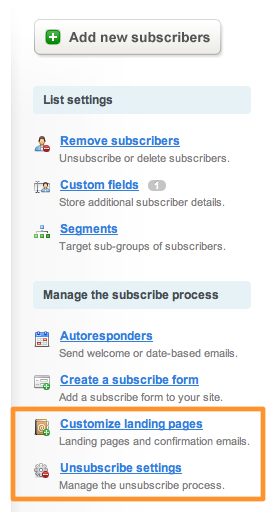
Jump into your 'Lists & Subscribers' tab, and select the list you want to modify. Now on the right hand side, click through to 'Customize landing pages'. There you will see the option to enter a URL, under the heading 'Subscribe Confirmation Page (optional)'.
Once you save that change, each new subscriber will be added to your list, and then sent directly to that URL. That gives you the chance to completely control the design, and also to include some useful links or information, so you don't lose them from your site.
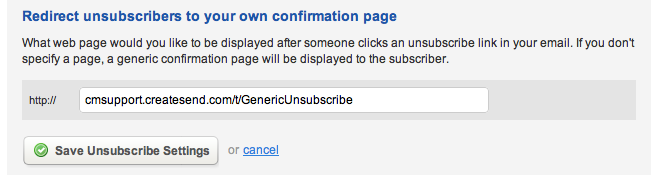
Again, start on the list details page under the 'Lists & Subscribers' tab. This time, select 'Unsubscribe settings' from the right hand column. On this page, you'll need to enter the URL under 'Redirect unsubscribers to your own confirmation page'.
Now when people unsubscribe, they will end up on your own page where you can thank them, and perhaps give them the chance to connect with you in other ways.
By default, the suppression list will store anyone who meets the following criteria: they unsubscribe, hard bounce, someone marks your emails as spam, or soft bounces for multiple campaigns. To ensure these individuals are never emailed again, the email addresses in your suppression list will not be added to any of your subscribers' lists when you import a list.
When you import a CSV or tab delimited file of addresses, they are first checked against the suppression list, and anyone who is on the suppression list will not be reimported. However, you can change any list to not check against the suppression list first (read on for details).
The suppression list does not prevent individuals from resubscribing themselves through a sign up form though, nor does it prevent you re-adding them via an API call.
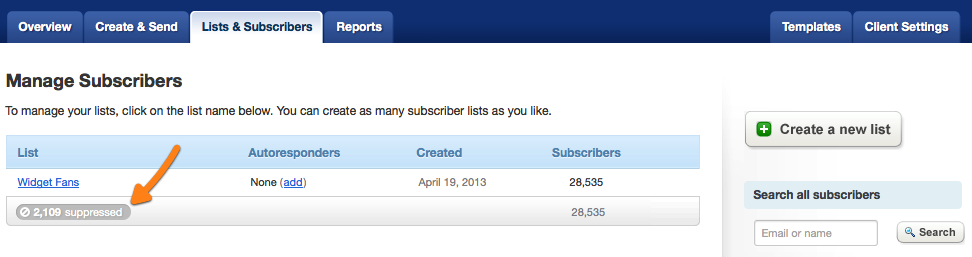
Each account has their own suppression list, which you can access at any time from the Lists & Subscribers tab, pictured below:
Once you access your suppression list, you can easily add and remove addresses you'd like to be included. Here's the main screen for a suppression list:
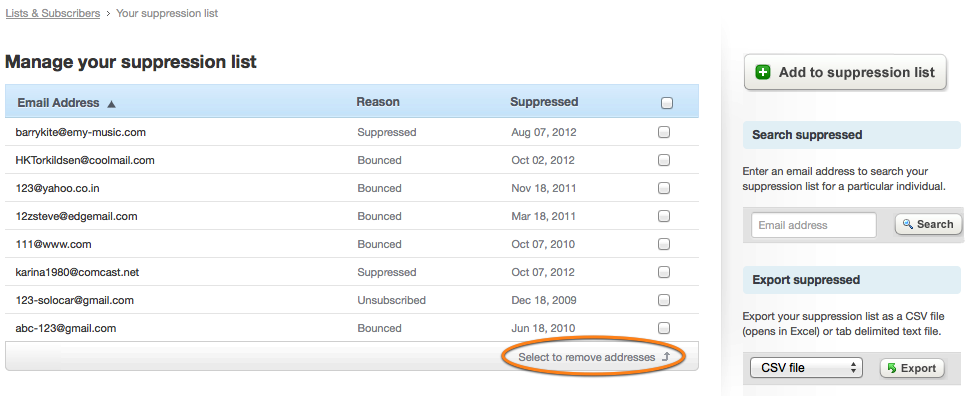
If you need to import someone who is on the suppression list (and you have their explicit permission to do so) you can easily remove them from the suppression list. Simply view the list, find the email and use the checkbox to select them. Then hit the 'remove selected' button.
Your suppression list records how somebody ends up being included on the list. Typically that would be because they unsubscribed, or bounced out, but you may also see 'suppressed', which means that they were manually added directly to the list. 'Reason unavailable' means that they were added a while ago, before reasons were recorded.
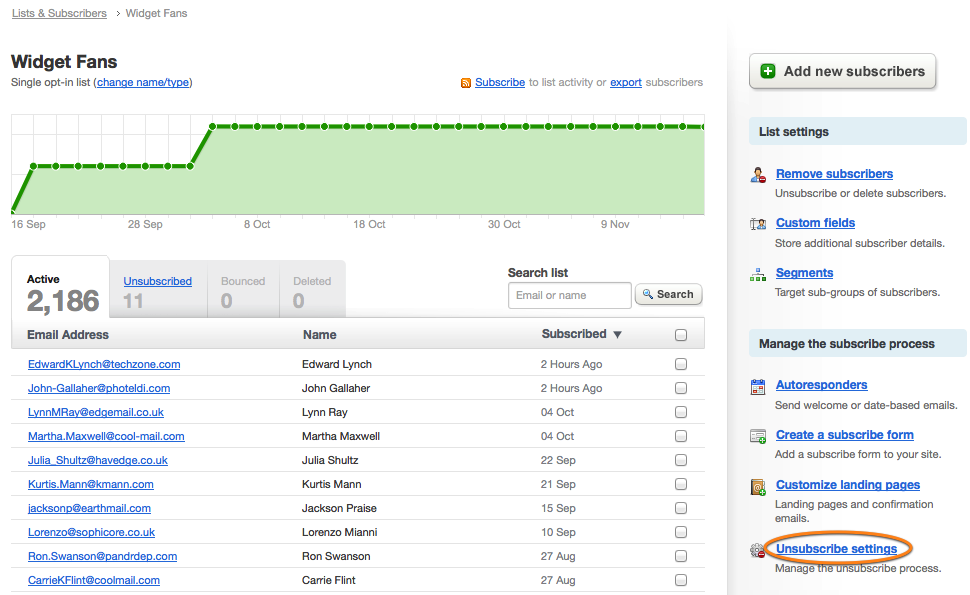
While all of your lists add any unsubscribes to the suppression list by default, you can turn this on or off on a list-by-list basis. If you'd like to ensure a particular subscriber list does not scrub any new subscribers against the suppression list, or update it with any unsubscribes, open the list and go to Unsubscribe settings in the right sidebar.
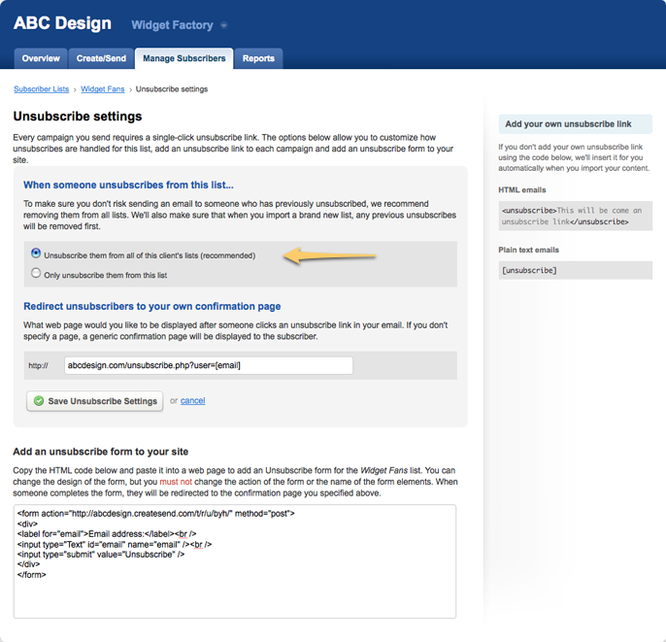
You'll now notice a setting at the top of Unsubscribe Settings that lets you set how any unsubscribes are handled. If you'd like to ensure this list never uses the suppression list, select "Only unsubscribe them from this list". If you'd like any unsubscribes to be added to the suppression list (which we recommend) select "Unsubscribe them from all <Client Name> lists".
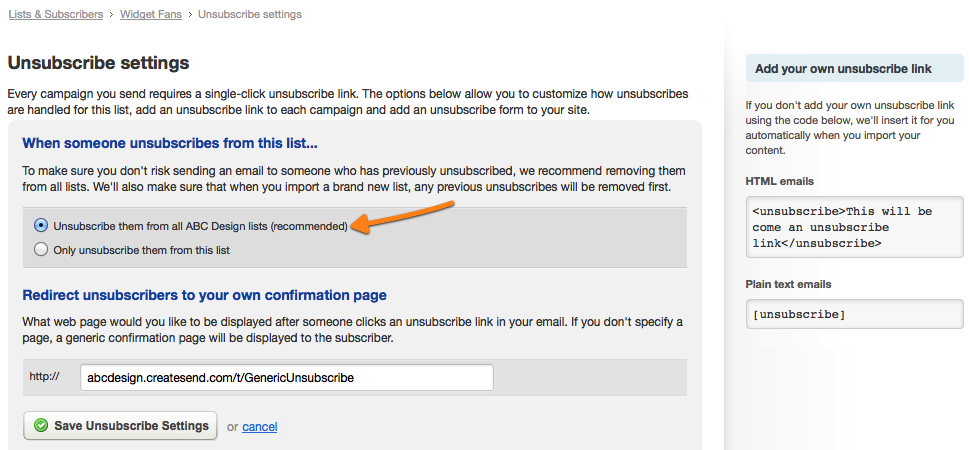
You can change this setting at any time. If you decide to change your subscriber list so that it hooks into the suppression list, you'll be given the option to make updates to both lists.
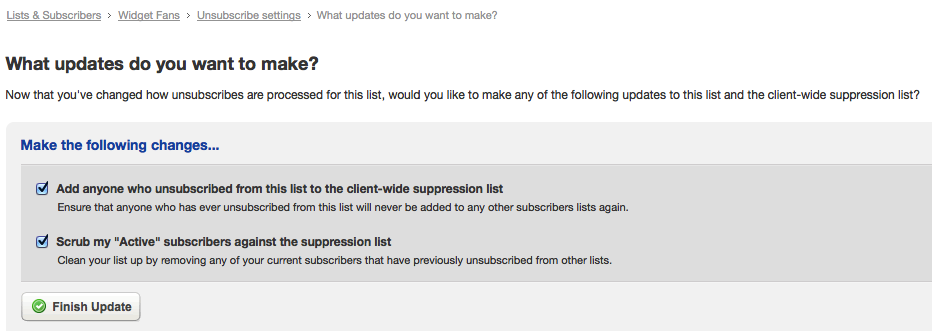
These options allow you to instantly add anyone who previously unsubscribed from that list to the suppression list. You'll also have the option to scrub all of the active subscribers in that list against the suppression list.
All of your subscriber lists will have 2 default fields; "Name" and "Email address". Any additional fields (up to the maximum of 20) in your subscriber list are called custom fields.
Custom fields can be used to store additional contact information such as a subscriber's address, city, country, phone number or other relevant data such as interests, birthdays or answers to a survey.
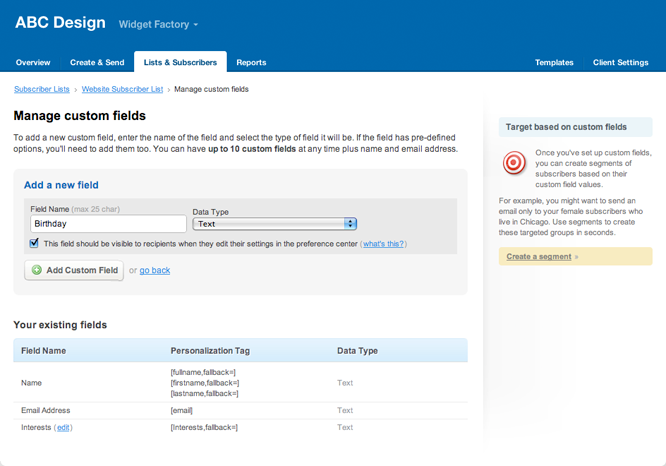
To manually create custom fields, just navigate to your subscriber list, then click on the "Custom fields" link in the right column. Here you can add new custom fields one at a time, giving each field a name and data type. You can also choose whether to have the field visible to recipients when they edit their settings in the preference center.
Tip You can also import multiple value custom fields when adding new subscribers to a list.
On your custom fields page, you will see that each custom field has a personalization tag that you can use to personalize the campaign. You may like to personally greet the recipient by their name or populate parts of the email with data relevant for the subscriber. Please note that each custom field value has a data limit of 250 characters.
You can also use the information in your custom fields to create segments in your subscriber list that you can send targeted campaigns to. This may include all subscribers who live in Canada, have a birthday in August or those who like dogs as pets.
When you are viewing your subscriber lists, only the email and name fields will show up in list view. To see the custom field values for any specific email address, just click on that address to view the subscriber snapshot.
You can see each field there, and you can also easily edit the values. When you export your list, you can choose to export any or all of the custom field values for each subscriber too.
Each list can have a maximum of 20 fields, in addition to the default name and email fields that every list has. It is not possible to add more than 20 fields at this time.
You sure can. When you are looking at the list of custom fields for your specific subscriber list, just hover over the one you want to remove. Over on the right a trash can icon will display. Click that to remove the field. Please be aware that will also delete any data already stored in that field for all your subscribers.
You will be given a warning, but still - be careful!
Now that you've defined the custom fields, you might want to collect data for those fields on your subscribe form. Just click the 'Create a subscribe form' link for your list, and you'll be able to select the new fields you want to collect, and then regenerate the HTML code to paste on your site.
By default, the only field in your sign up form that is compulsory is the email address. Everything else can be left blank, and the sign up will go through. Most of the time that's fine (and makes it easy for people to sign up), but in some cases it is critical to collect other information.
This post explains one way to make sure that certain fields are filled in before the form can be submitted. We'll be using the jQuery JavaScript library, because it saves a lot of time and makes it easy to get started.
Jump into your subscriber list page, and generate a signup form, if you don't already have one set up. Here is a very basic example of what you'll have:
<form action="http://somethingcreatesend.com/t/r/s/oooooo/" method="post" id="subForm">


                                        <label for="name">Name:</label>

                                        <input type="text" name="cm-name" id="name" size="25" />


                                        <label for="oooooo-oooooo">Email Address:</label>

                                        <input type="text" name="cm-oooooo-oooooo" id="oooooo-oooooo" size="25" />


                                        <input type="submit" value="Subscribe" />


                                        </form>
For the purpose of this example, I'm simply going to add validation to make name a required field, and also check that the email address field contains a well-formed email address. You'll firstly need to add the following lines into the head of the html page your form will be on. These lines grab jQuery and the validate plugin as well as calling the validate function on your subscribe form:
<script type="text/javascript" src="http://ajax.googleapis.com/ajax/libs/jquery/1.4.2/jquery.min.js"></script>


                                        <script type="text/javascript" src="http://ajax.aspnetcdn.com/ajax/jquery.validate/1.8/jquery.validate.min.js"></script>


                                        <script type="text/javascript">    $(document).ready(function(){    $("#subForm").validate();    }); </script>
Now add the required class to both your form elements as well as the email class to your email address form element such that your two form elements looks like this:
<form action="http://somethingcreatesend.com/t/r/s/oooooo/" method="post" id="subForm">


                                        <label for="name">Name:</label>

                                        <input type="text" name="cm-name" id="name" size="25" class="required" />


                                        <label for="oooooo-oooooo">Email Address:</label>

                                        <input type="text" name="cm-oooooo-oooooo" id="oooooo-oooooo" size="25" class="required email" />


                                        <input type="submit" value="Subscribe" />


                                        </form>
That's it! You now have a form which checks for an non-empty name and a well formed email address using jQuery, before it's submitted to your list.
If you attempt to submit the form without entering values for either the name or email address, you will see error text appear next to the relevant field. If you view source at that point, you'll see that there is an extra <label> element, with a class of "error".
<label for="name" generated="true" class="error" style="display: inline; ">This field is required.</label>Just add a style declaration for the error class to control how they appear. If you want to customise the logic which actually validates your input, you can do that by following the jQuery validate plugin API Documentation.
First, we remove duplicates for every campaign you send, so if a recipient is subscribed to multiple lists and you send a campaign to all of those lists, they will only ever receive one copy of your email.
What about unsubscribes?
By default, unsubscribing from any list will also remove that person from all of the client's other lists. That applies whether sending to one list or many at the same time.
You can change that behavior by going to 'unsubscribe settings' for any list, and selecting 'Only unsubscribe them from this list' from the section titled 'When someone unsubscribes from this list...'.
Also, when you upload subscribers into an existing list, remember that all bounced and unsubscribed recipients WILL NOT be added to the list. We remember everyone that ever unsubscribed. The only way an unsubscribed individual can get back into your list is to subscribe again from your web site.
While there is not a built-in "merge" function, it is possible to take two lists and turn them into one. The steps involved are very simple:
The software will automatically detect any duplicate subscribers so if an address is already on the list you import into, the original subscriber will just be updated and you'll only have one copy of that address in the final list.
If you are dealing with simple lists (just names and email addresses, for example), then there isn't much else to worry about, and the basic process will do the job. However if your lists are more complex, here are some items you'll need to watch out for:
Keep in mind that you will lose the subscriber and campaign history from one list (when you merge it into another one) unless you keep that old list around for future reference.
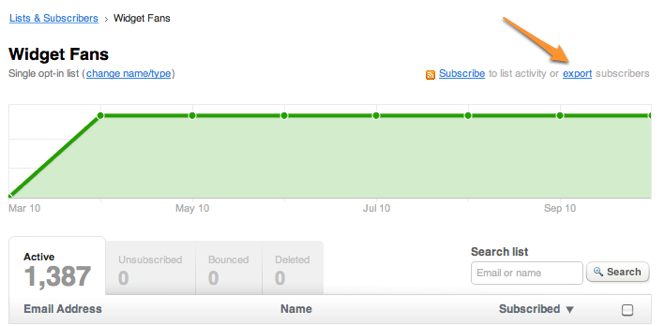
You can export your subscribers as a either a CSV (Comma Separated Values) file or a tab delimited text file.
In your account, just navigate to your subscriber list under 'Lists & Subscribers', and click Export subscribers.
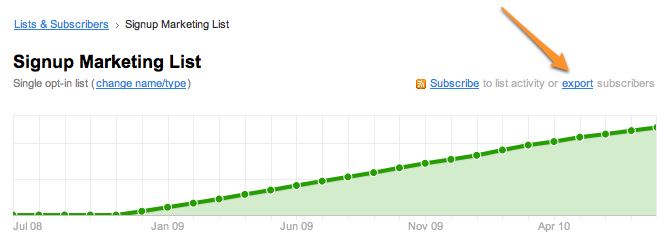
On the next page, you can select to export active, bounced, manually deleted, unsubscribed, or all subscribers, as well as the fields you wish to include in your file. To export, click the Export Subscribers button.

If you modify your subscribers' details outside your account, you can import them back into the same list to update their details.
For each of your subscriber lists, you can have up to 20 custom fields that hold different information about each subscriber. Date fields are one of the types you can add, and those fields can then be referenced in your autoresponder rules.
To manually create custom fields, just navigate to your subscriber list, then click on the 'Custom fields' link in the right column. Here you can add new custom fields one at a time.
Give your new field a sensible name (like 'birthday' for example) and then use the drop down menu to choose 'date' as the data type.
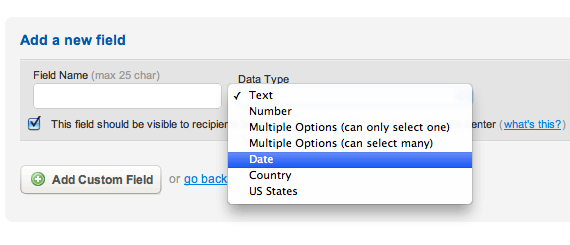
Click the 'Add Custom Field' button to save your new date field. Now you'll be able to import dates into your subscriber list from a file, or manually add them into that field by clicking on any email address in your list.
The new field will also automatically be available to select as part of an autoresponder rule, so you can send emails triggered on a certain date, or based on that date.
The import process is pretty smart and will generally be able to work out what format your dates are in, but the clearest format to use is YYYY/MM/DD if you have the choice.
Otherwise, as long as your data is consistent, the dates should all be correctly recognised even if you are using a different date format.
Note: At this stage, the earliest date that can be entered is 02/01/1900. Dates earlier than this in your custom fields will be changed to 02/01/1900.
Now that you have the field, you can start adding dates for each person. If you already have the dates in some other system, the best approach is to reimport your entire list, with the extra date column.
You'll be prompted to match up the new date column with the field in your list. Any existing subscribers will be updated with the date and any other updated information, and anyone who was unsubscribed or bounced before won't be re-added.
If you want to start collecting dates, you'll want to update your subscribe form to include the new field. Go to 'create a subscribe form' for that list, and make sure to check the box to include your new field.
Then regenerate the HTML code and paste it into your website. Now new subscribers will be able to enter the relevant date when signing up.
If you've created a subscribe form and added it to your website, it will normally just work. However, if your form is all correct, but pressing the 'submit' button seems to do nothing at all, the problem may be an ASP.net issue.
It is common for sites running on ASP.net to have a <form> element surrounding the entire content of the page as part of the way the site is controlled. Unfortunately, that means any sign up form you add to the page will be nested inside the wrapping form.
That nesting stops the sign up form from submitting anything, and it results in a non-functional sign up form. There isn't any way to make that work as is, but you do have a couple of options.
If you have people joining your lists via more than one form or sign up method, it can be very useful to know how each person joined.
For example, if you have a signup form on your homepage, but also at the end of your checkout process, you can see which is more effective for you, and also segment your list accordingly.
First, under your 'Lists and Subscribers' tab, click through to the specific list you want to modify. Then:
<input type=“text” to <input type=“hidden”. This makes the field invisible to your visitors, but still submitted with the rest of the form.value=“frontpage” and the checkout page could be value=“checkout”.If you click through on any email address in your list, you'll be able to see the value for the source, if any. You can also use the 'Export subscribers' link to export your list including the new field.
Finally, you could create new segments based on your source field, and modify your message according to how they joined. This technique could be extended to record offline signups, if you manually fill in the source field when inputting new subscribers. You could then have lists segmented by the specific store or event they first joined at.
If you would like to remove an entire subscriber list (including all the subscribers and their history) you can do that from the 'Lists & Subscribers' tab.
Just hover your mouse over the list you want to remove (the row highlights to show you which list you are on) and click the trash icon which appears on the right hand side.
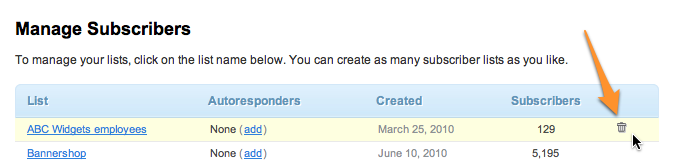
You will be asked to confirm that you want to delete the whole list. Keep in mind that you won't be able to undo it, so be careful!
If you are not sure which list (or lists) a particular address is in, it is easy to search all your lists at once. Hop into your 'Lists & Subscribers' tab and you'll find the 'Search all subscribers' field in the right hand column.
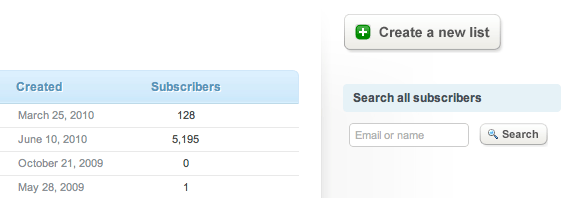
Enter the address you are looking for and hit 'Search' to see a table showing the different lists that email address is in, and the status of the address for each list.
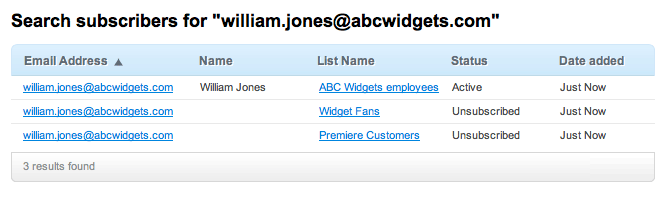
You can click on the list name to jump into that list, or on the email address to access the the subscriber profile specific to that individual list.
When you create a new campaign you can choose between plain text only, and HTML+plain text. If you choose HTML+plain text option both versions are combined into a multipart email. Then the subscriber's mail server or email program decides whether to display the text or the HTML version of your email.
What if you want to let your subscriber choose for themself which version to see? Basically, you'll need a way for them to tell you which version they want, and then send two separate campaigns to the text only subscribers and the HTML subscribers. Here's how:
Go to your "Lists & Subscribers" tab, and jump into the subscriber list you want to work with. Create a new custom field of type "Multiple Options (can only select one)" using the link in the right hand column. Give it a name like "EmailType".
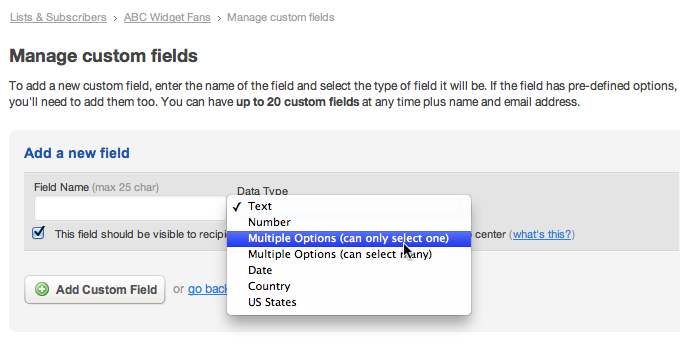
Add two options to the new field, one called "HTML" and one called "Text only".
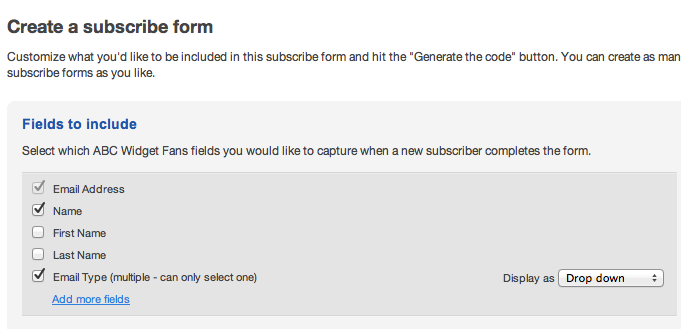
From the list details page, now choose "Create a subscribe form". On this page, you can check the box next to your new EmailType field to add it to the sign up form. Generate the code, and add it to your signup page. From now on, new subscribers will be able to set their preference when signing up.
Segmenting is a way to create sub-lists inside your main subscriber list, based on the values of certain fields for example. In this case, you will want to create two segments, one with a rule like
"EmailType Equals Text Only"
and the second with a rule like
"EmailType Equals HTML Or EmailType Is Not Provided"
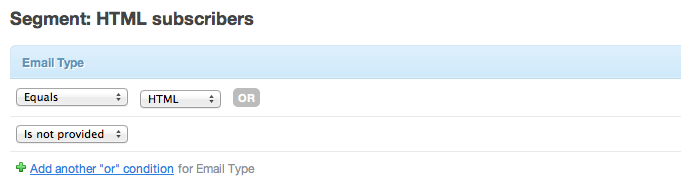
That second segment will catch everyone who signed up in the past, since they won't have set their preference yet.
Now when you want to send your campaign out, you will need to create a text only campaign, and an HTML+plain text campaign. For each campaign when you get to the point of choosing recipients you'd select the matching segment.
That's it! Don't forget you can also use a preference center link in your campaigns to let your subscribers update their choice of email type too.
A segment is a subset of one of your existing subscriber lists. For example, instead of emailing everyone on your 'Widget Fans' list, you might only want to send an email to subscribers who live in the United States. That's a perfect job for a segment.
Segments can be based on any default fields in your list (e.g. 'name', 'email address') as well as any custom fields you create for the list (e.g. 'gender', 'favorite products', 'email frequency preference').
You can also create segments based on campaign activity. For example, you might want to see which subscribers clicked links related to commercial widgets versus widgets for the home so you can segment based on content interests.
But let's start with the basics. Below are instructions for building a segment based on the default field, 'date subscribed'.
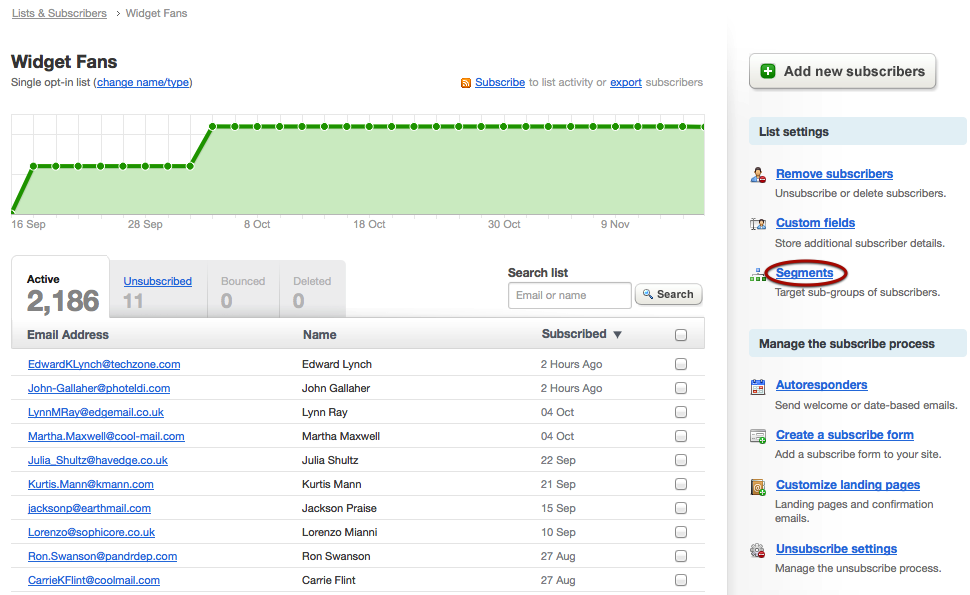
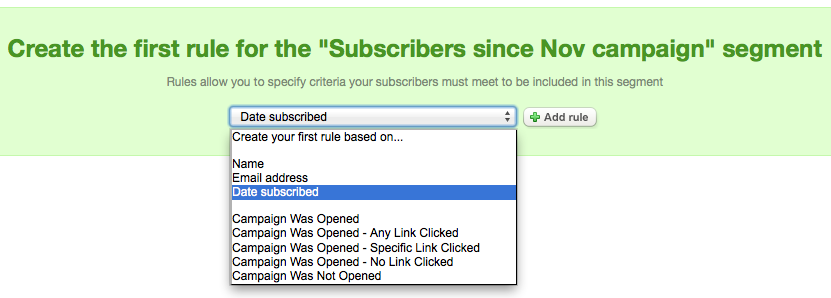
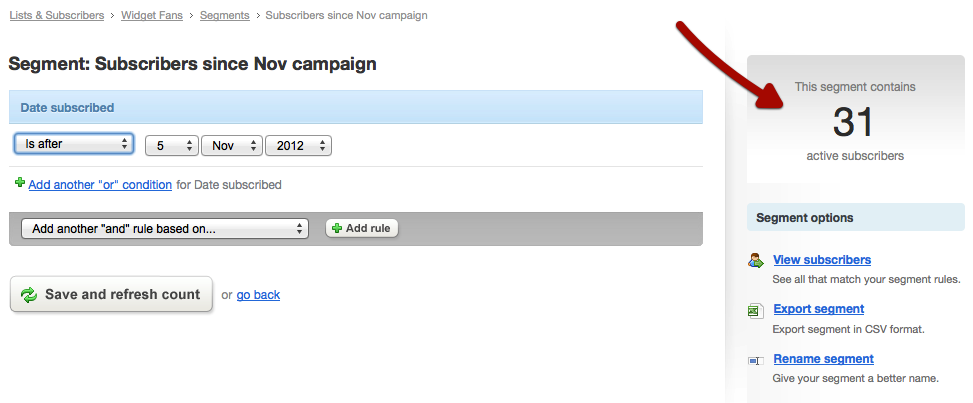
When a new segment is created the system finds every person on the subscriber list who matches the rule/s you specified, and the total number of subscribers is displayed in the right sidebar (as shown below).
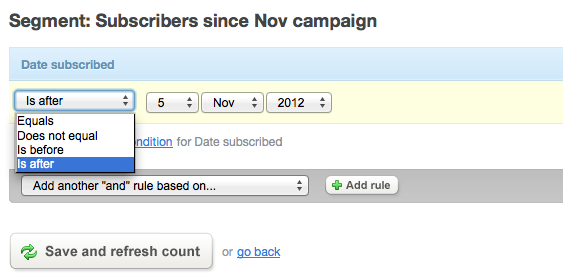
You can combine any number of rules to build a segment, although not all "conditions" are available for every rule.
Note For segments based on campaign activity (e.g. grouping all subscribers who opened your last campaign and clicked a link) you must create the segment after the campaign has been sent.
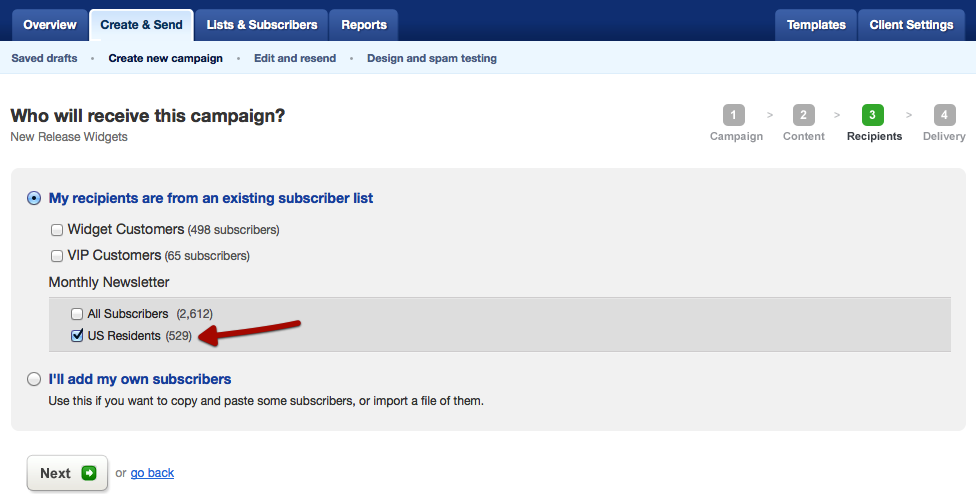
Next time you create a new campaign and get to the "select recipients" part, your new segment will show up as an option:
Once you've created a segment it will keep itself updated as your list grows/changes. When a new subscriber comes along who matches the segment's rule/s (e.g. the subscriber is female, lives in Baltimore, is interested in widgets for the home) they are automatically included.
Similarly, subscribers who no longer match the the segment rules - for example by becoming inactive or updating their details - are automatically removed and will no longer be included in the segment.
Yes, each time you send to a segment of your list, you will pay the normal rates for a campaign.
Yes, if that person fits the rules for multiple segments that have been created. But no matter how many segments you send to in a single campaign, each subscriber will only get one email (i.e. you don't need to worry about anyone receiving duplicate emails).
No - segments are automatically updated before you send to them, and each time you view the segment details. They don't update 'live' because of the amount of processing that would require.
There's no way to manually add or import people into a segment; you just need to make sure that the new people meet the rules setup for your target segment and that segment will automatically include them.
If you wanted to setup a segment of specific subscribers, you'd need to add a custom field that you can use to identify them. For example, add a "friends" field, and add a value of "yes" for each of the people you want to email separately.
Sorry, no. At the moment, you can only use 'Contains' and 'Does not contain' rules for the email address.
Subscriber "snapshots" are a full profile page of information and activity reports for individual subscribers. This data is really useful for learning more about your email audience, especially in conjunction with other systems you use for customer records.
This article explains how to generate a direct link to individual subscriber profiles, like the example pictured below:
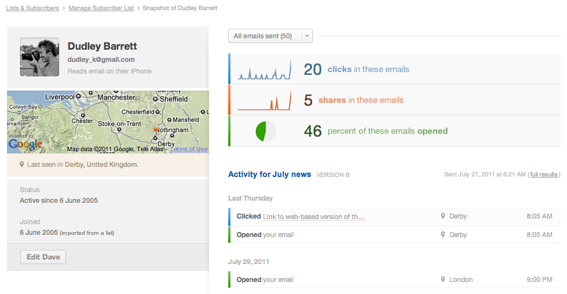
In Campaign Monitor, subscriber "IDs" are simply the contact's email address. In the instructions that follow, we'll use Dudley Barrett (pictured above) as our example subscriber.
Dudley Barrett's subscriber email address is: dudley_k@gmail.com
Therefore, the link URL for Dudley's profile is:
https://yourdomain.createsend.com/subscribers/search?search=dudley_k%40gmail.com
To copy and use the URL above to generate your own links, just edit it in the following ways:
Handy to know:
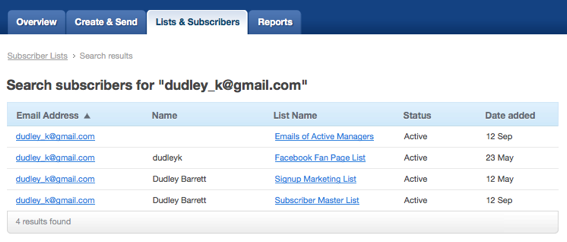
If you get this type of screen view (above), just click the subscriber's email address alongside the "List Name" you want to view history and activity for.
An autoresponder is the term for one or more emails you can automatically have sent to your subscribers based on certain rules. You may also know these as 'trigger' emails and 'drip campaigns'. A common example of an autoresponder is a series of emails that are automatically sent to each new subscriber after they sign up to a list.
The key is once you setup an autoresponder, it can run itself without any effort on your part. You can of course adjust and improve it over time.
Autoresponders are handy in a lot of different situations. Below are just a few examples of how autoresponders can be setup to increase sales, improve your customer service and drive ongoing loyalty and business from your email list.
No doubt once you get started you'll think of a bunch of options that make sense in your particular situation.
Research has shown that to really sell a product or an idea often requires repeated contact with that product, or idea. Having a series of emails
The first thing to know about using autoresponders is that they are tied to just one specific subscriber list. So you'll want to jump into your 'Lists & Subscribers' tab, and select the list you want to work with.
There is a column for 'Autoresponders' which will show the number of existing autoresponders and a link to add more. Click the 'add' link to setup a new autoresponder or 'view' if you've already set one up.
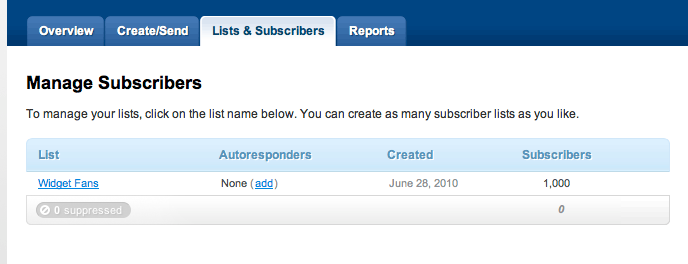
You can also access the autoresponders for any list directly from the list detail page, in the column to the right hand side.
You'll see a link to autoresponders and a count of how many are already setup for that list.
Also in this column (under the 'List settings' header) is the link to manage your custom fields, where additional date fields can be added.
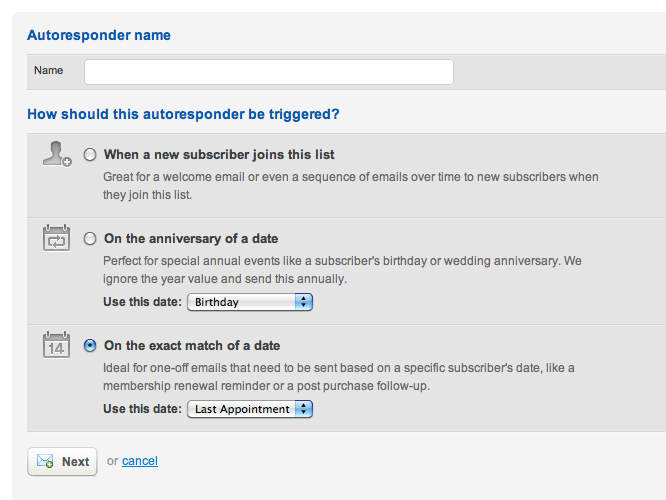
On the following page, you can name your autoresponder series, and then select the "trigger" for how the emails will be sent.
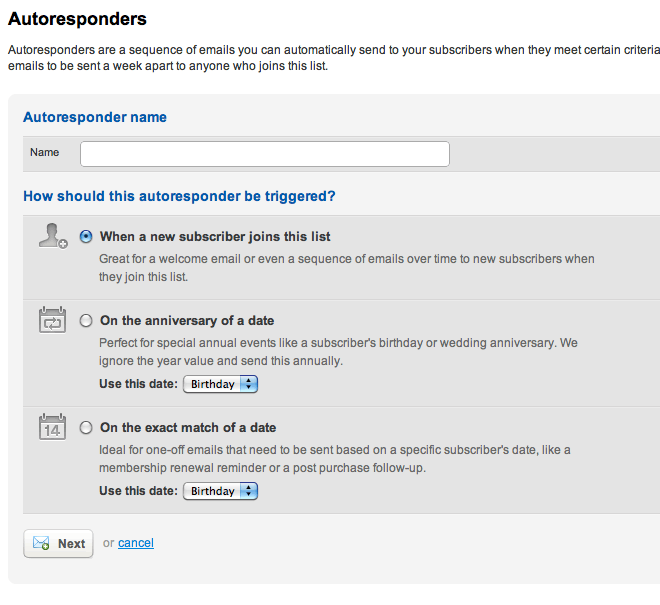
Name your autoresponder series
You'll want to give your autoresponder a name that will be understandable later when you come back to modify it or view the reports. Keep in mind that each autoresponder could contain several different emails, each with their own subject line and content.
Specify how the emails should be triggered
There are three different ways to start an autoresponder series:
Option 1 lets you send emails on or some specific time after a person joins your list. That's what you'd choose for a 'thanks for signing up' email, or for 'here's how our system works' content.
The email will be automatically sent anything from right away to weeks or months after the individual's signup date, and each list can only have one autoresponder series based on the sign up date.
Option 2 lets you setup one (or more) emails to be sent on, before or after a date that is stored in a custom field for each subscriber. The most obvious example is a 'Happy Birthday' email that you'd setup to be sent automatically.
Of course, you need to make sure you have the custom field setup, and that the subscriber has a birthday set in their records. For anniversary emails, it doesn't matter what year is defined, it is only the month and day that are checked to see if an email should be triggered.
Option 3 takes a custom field date value and lets you trigger emails based on that exact date (including the year). So you could have an appointment reminder that sends exactly 12 months after the date set for 'last appointment', for example.
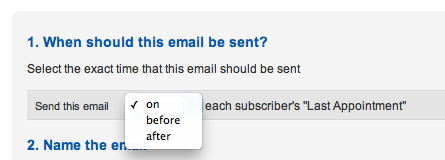
Again, the email can be sent on, before or after the date, but for this option the year is important, not just the day and month.
Once you have selected which type of autoresponder you want to send, click 'Next' and move on to specify the particulars for the first email in the series.
After naming and labelling your email, you will go through the standard campaign setup process. All the same options for importing or creating a campaign from an existing template are available to you.
Your autoresponder might consist of just one email, or as many individual emails as you like. Each email has its own trigger rules, and you can edit or delete each one independently, without deleting the whole autoresponder.
Continue to setup your emails until you have them all just the way you want them.
Important Note: If you create an autoresponder based on a template, updating the template will not update the autoresponder campaign (that's to prevent you sending out broken autoresponders while you are still working on template updates). If you'd like to apply the template changes to your autoresponder, jump back into your autoresponder email and make a change through the content editor (e.g. edit some text). When you save that change, the new template is re-applied.
This applies to Google Analytics integration, also: once you've enabled Google Analytics in your account, you then do just need to re-import your autoresponder content back into the system and go through the entire import process again for Google Analytics to be added and appended to your autoresponder links.
Before you can actually start the autoresponder, you will need to have email credits available. Each individual email sent costs 1 credit, and if your account runs out of credits, the autoresponders will automatically stop sending.
Now it is time to flip the switch and turn it on! On the main page for each autoresponder, over on the right hand side is the 'Start autoresponder' button. Click it to kick things off.

If the autoresponder you started is triggered by a signup date, then emails will start going out as soon as someone signs up and the trigger fires off.
You'll notice the button now changes to 'Pause autoresponder', and you can click that to stop the emails from going out at any time.
Now that your autoresponder is running, reports will be generated for you automatically. At the top of the main autoresponder page are summary statistics, and a graph showing an overview of emails sent over time.
Then for each email in the series, you can see the number of emails sent and the percentages for opens and clicks. You can drill down further to see which specific links are being clicked.
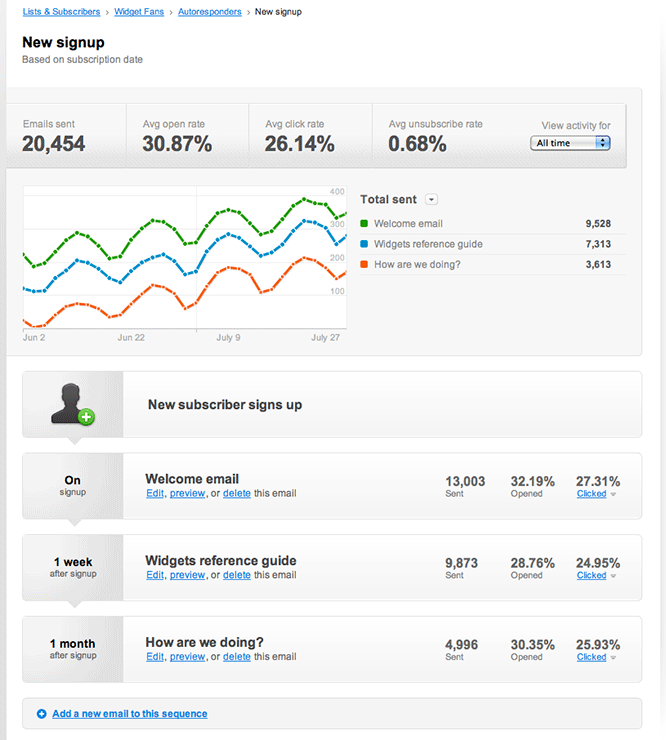
Notice that you can interact with the drop down menu on the graph to show Opens, Sent, Clicks or Unsubscribes for all of the emails in your series.
An autoresponder is one or more automatically sent emails, sent to individual subscribers on your list. The emails go out based on certain trigger conditions, such as a specific date, or a subscriber joining your list.
There isn't a hard limit on the total number of emails you can setup inside an autoresponder, and unless you set up a ton of them, you shouldn't run into any problems at all.
However, there is a limit on the number of different autoresponder series you can define. That is based on the different triggers you have available to us.
You may have just one autoresponder triggered by a list signup, and then one autoresponder attached to each different custom date field in that list.
So if you have a list with name, email, and birthday fields, you could setup one autoresponder for the signup, and one for the birthday field. Each of those could include many separate emails, but you could not add any more autoresponder series.
To add more series, you would have to add a new date field to your list, to serve as the trigger.
By default, the autoresponder emails will go at 12am (i.e moments after midnight) on the date that is specified. So if you have an autoresponder set for a birthday email, in the first minute that it is a subscribers birthday, the email will go out.
That's based on the timezone set in your account (not the subscriber's timezone which we don't know). If you'd like to send the email at some other point during that day, you can set a more specific time, like 10 hours after [birthday] and the email will go out then (10am in this example).
Each individual autoresponder email costs 1 credit to send out (so if you have a birthday email setup, then each person you automatically wish 'happy birthday' costs 1 credit). If the account in question is set to pay using a monthly pricing plan however, then all autoresponder emails are included at no additional cost.
If your credits run out, then all of your autoresponders will be paused. You'll need to get some more credits, and then start them manually again. Don't worry though, we'll email you well in advance when your credits start to get low, so you'll have time to purchase more.
So it is much better to top up your credits before they run out.
Pausing an autoresponder immediately stops any emails from being sent out, including any that were already triggered. For date based autoresponders, any email that would have triggered on a certain day won't be sent if the autoresponder is paused when the trigger time occurs.
Important note about pausing signup autoresponders:
When you pause a signup autoresponder, anyone who has already signed up and triggered the signup autoresponder will not get any further emails, even if there were some left in the sequence.
So it is best not to pause those unless you really need to.
An autoresponder can have one or more emails in a sequence, and you can click through to the autoresponder's page and edit each of those just like you'd edit a draft campaign.
The autoresponder will automatically send out whatever is the current version, and any existing reporting will be kept. New link clicks will just appear in addition to the clicks for the previous content.
No, anybody who is already on the list when you turn on the autoresponder won't actually trigger the 'on signup' action, so they won't get the email.
No, an autoresponder is defined by it's type - on subscriber, anniversary or specific date. If you need to change that, you'll need to setup a whole new autoresponder. So it pays to be careful in setting them up.
The import process is pretty smart and will generally be able to work out what format your dates are in, but the clearest format to use is YYYY/MM/DD if you have the choice.
If not, then as long as your dates are all consistent in format with each other you should not run into any problems.
Just go to your subscriber list, and click 'autoresponders' in the right hand column. You'll see a list of the autoresponders you've setup.
Hover over the row containing the autoresponder you want to delete, and a trash can icon will appear over on the right. Click that to delete the entire autoresponder.
Be warned that you'll lose all the emails and reporting though, so you might instead choose to click into the specific autoresponder and just click 'pause'. That will stop all emails from being sent out, and you won't lose any data.
Importing subscribers from a file does not trigger any autoresponders based on signup, nor does manually typing them into your account. Importing subscribers using the batch import API method will not trigger signup autoresponders either by default.
The batch import API method's default setting can be overridden by adding the QueueSubscriptionBasedAutoResponders parameter and setting it to true. Adding people via a public web form, or individually via the API will trigger the signup autoresponder as well.
If you create an autoresponder based on a template, updating the template will not update the autoresponder campaign (that's to prevent you sending out broken autoresponders while you are still working on template updates). If you'd like to apply the template changes to your autoresponder, jump back into your autoresponder email and make a change through the content editor (e.g. edit some text).
When you save that change, the new template is re-applied.
No, if a person has unsubscribed from your list, subscribing again will not restart the autoresponder sequence for them. If they resubscribed when they were part way through a sequence, they will get the future emails still, but it isn't possible for them to go back to the start.
However, if you are using the API you can optionally override this (refer to the subscriber import documentation).
It's easy to setup a 'happy birthday' email that will be automatically sent to each of your subscribers on their individual birthday. Of course, it doesn't have to be a birthday email, it could be any kind of annual email, from a special birthday discount offer to a reminder about that highly anticipated annual dental check up.
Here's how to set up an annual email.
The key to the whole process is knowing what date the email should be sent on for each person. So you need to go to your subscriber list, and add a custom date field if you don't already have one.
If you already have the dates in some other system, the best approach is to reimport your entire list, with the extra date column included.
You'll be prompted during the import process to match up the new date column with the field you just created. Any existing subscribers will be updated with the new date and any other updated information, and anyone who was unsubscribed or bounced before won't be re-added.
If you want to start collecting dates, you'll want to update your subscribe form to include the new field. Go to 'create a subscribe form' for that list, and make sure to check the box to include your new field.
The first thing to know about using autoresponders is that they are tied to just one specific subscriber list. So you'll want to jump into your 'Lists & Subscribers' tab, and select the list you want to work with.
There is a column for 'Autoresponders' which will show the number of existing autoresponders and a link to add more. Click the 'add' link to setup a new autoresponder or 'view' if you've already set one up.
On the following page, you can name your autoresponder series, and then select the "trigger" for how the emails will be sent.
Name your autoresponder series
You'll want to give your autoresponder a name that will be understandable later when you come back to modify it or view the reports.
Specify how the emails should be triggered
There are three different ways to start an autoresponder series:
For a birthday email (or other types of annual email) you want to choose option 2, so that every year on the specific date for that subscriber, an email will send.
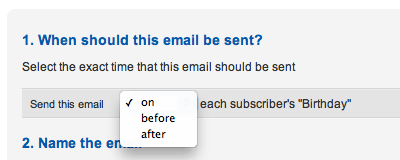
Define exactly when the email should be sent
By default, the email will go out at 12am on the date you've specified, in the timezone chosen in your client account settings. So the birthday email will be triggered the instant the day changes over in your timezone.
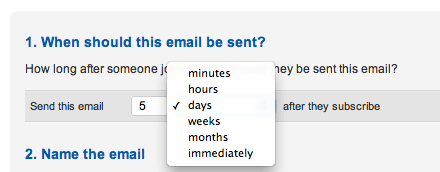
You can modify that, and choose to send the email instead some hours, days or months before or after the exact date. That could be helpful for sending a birthday email in the middle of the day (e.g. Send it "12 hours after [birthday]") or sending a reminder a week ahead.
After naming and labelling your email, and choosing when it should send, you will go through the standard campaign setup process. All the same options for importing or creating a campaign from an existing template are available to you.
Your autoresponder might consist of just one email, or as many individual emails as you like. Each email has its own trigger rules, and you can edit or delete each one independently, without deleting the whole autoresponder.
Continue to setup your emails until you have them all just the way you want them.
Now it is time to flip the switch and turn it on! On the main page for each autoresponder, over on the right hand side is the 'Start autoresponder' button. Click it to kick things off.
From this point onwards, emails will automatically go out each day (assuming that there is someone on your list who has a birthday or other anniversary on that day). You'll notice the start button now changes to 'Pause autoresponder', and you can click that to stop the emails from going out at any time.
Now that your autoresponder is running, reports will be generated for you automatically. At the top of the main autoresponder page are summary statistics, and a graph showing an overview of emails sent over time.
Then for each email in the series, you can see the number of emails sent and the percentages for opens and clicks. You can drill down further to see which specific links are being clicked.
Notice that you can interact with the drop down menu on the graph to show Opens, Sent, Clicks or Unsubscribes for all of the emails in your series.
When your signup page has done its job, and you've convinced someone to join your list, that's a great opportunity to start building a relationship with them.
While you can already setup a free welcome email (via the 'Customize landing pages' page for each list), using an autoresponder instead gives you a lot more power, flexibility and reporting. Read our introduction to autoresponders to get a quick overview if you've not set one up before.
Autoresponders can be one or more emails that are triggered independently for each subscriber. In this case, the trigger is 'on sign up'. So When a new subscriber joins your list, you can define exactly what happens.
Some common examples are:
The first thing to know about using autoresponders is that they are tied to just one specific subscriber list. So you'll want to jump into your 'Lists & Subscribers' tab, and select the list you want to work with.
There is a column for 'Autoresponders' which will show the number of existing autoresponders and a link to add more. Click the 'add' link to setup a new autoresponder or 'view' if you've already set one up.
On the following page, you can name your autoresponder series, and then select the "trigger" for how the emails will be sent.
Name your autoresponder series
You'll want to give your autoresponder a name that will be understandable later when you come back to modify it or view the reports.
Specify how the emails should be triggered
There are three different ways to start an autoresponder series:
In this case, we want the trigger to be option 1, someone signing up to your list. However the email doesn't have to go at the instant they signup, you can set it to go out some time later.
Define exactly when the email should be sent
By default, the email will go out pretty much the moment someone joins your list (or when they click the confirmation link if it is a confirmed opt-in list).
You can modify that, and choose to send the email instead some hours, days or months after the sign up date. That could be helpful for a 'how did you find our widget?' type follow up, as an example.
After naming and labelling your email, and choosing when it should send, you will go through the standard campaign setup process. All the same options for importing or creating a campaign from an existing template are available to you.
Your autoresponder might consist of just one email, or as many individual emails as you like. Each email has its own trigger rules, and you can edit or delete each one independently, without deleting the whole autoresponder.
Continue to setup your emails until you have them all just the way you want them.
Now it is time to flip the switch and turn it on! On the main page for each autoresponder, over on the right hand side is the 'Start autoresponder' button. Click it to kick things off.
As soon as you turn it on, anyone who joins your list via a sign up form or via an API call will trigger the autoresponder and receive the emails just as you defined them.
You'll notice the start button now changes to 'Pause autoresponder', and you can click that to stop the emails from going out at any time.
Please note: If you import subscribers manually, or from a file, then that does not trigger any 'on sign up' autoresponders to be sent.
Now that your autoresponder is running, reports will be generated for you automatically. At the top of the main autoresponder page are summary statistics, and a graph showing an overview of emails sent over time.
Then for each email in the series, you can see the number of emails sent and the percentages for opens and clicks. You can drill down further to see which specific links are being clicked.
Notice that you can interact with the drop down menu on the graph to show Opens, Sent, Clicks or Unsubscribes for all of the emails in your series.
For each of your subscriber lists, you can store up to 20 custom fields. One type of custom field you can store is a date, for example a purchase date or an expiry date.
Using the autoresponders feature, you can easily setup one or more emails that will automatically be sent before, on or after that specific date. So each subscriber would get the emails based on their own individual date. This differs from a recurring autoresponder (e.g. a birthday email) because it is only triggered once.
Some common examples are:
Any kind of date based event that just happens once is an ideal use for a date based autoresponder.
Here's how to set one up:
The key to the whole process is knowing what date the email should be sent on for each person. So you need to go to your subscriber list, and add a custom date field if you don't already have one.
If you already have the dates in some other system, the best approach is to reimport your entire list, with the extra date column included.
You'll be prompted during the import process to match up the new date column with the field you just created. Any existing subscribers will be updated with the new date and any other updated information, and anyone who was unsubscribed or bounced before won't be re-added.
If you want to start collecting dates, you'll want to update your subscribe form to include the new field. Go to 'create a subscribe form' for that list, and make sure to check the box to include your new field.
The first thing to know about using autoresponders is that they are tied to just one specific subscriber list. So you'll want to jump into your 'Lists & Subscribers' tab, and select the list you want to work with.
There is a column for 'Autoresponders' which will show the number of existing autoresponders and a link to add more. Click the 'add' link to setup a new autoresponder or 'view' if you've already set one up.
On the following page, you can name your autoresponder series, and then select the "trigger" for how the emails will be sent.
Name your autoresponder series
You'll want to give your autoresponder a name that will be understandable later when you come back to modify it or view the reports.
Specify how the emails should be triggered
There are three different ways to start an autoresponder series:
For a general date based autoresponder option 3 is the one to go for, a one-off trigger that is based on a date set for each subscriber.
Define exactly when the email should be sent
By default, the email will go out at 12am on the date you've specified, in the timezone chosen in your client account settings. So the first email will be triggered the instant the day changes over in your timezone.
You can modify that, and choose to send the email instead some hours, days or months before or after the exact date. That could be helpful for sending a reminder email in the middle of the day (e.g. Send it "12 hours after [expiry]") or sending a reminder a week ahead.
After naming and labelling your email, and choosing when it should send, you will go through the standard campaign setup process. All the same options for importing or creating a campaign from an existing template are available to you.
Your autoresponder might consist of just one email, or as many individual emails as you like. Each email has its own trigger rules, and you can edit or delete each one independently, without deleting the whole autoresponder.
Continue to setup your emails until you have them all just the way you want them.
Now it is time to flip the switch and turn it on! On the main page for each autoresponder, over on the right hand side is the 'Start autoresponder' button. Click it to kick things off.
From this point onwards, emails will automatically go out whenever the selected date field for a subscriber triggers the autoresponder. You'll notice the start button now changes to 'Pause autoresponder', and you can click that to stop the emails from going out at any time.
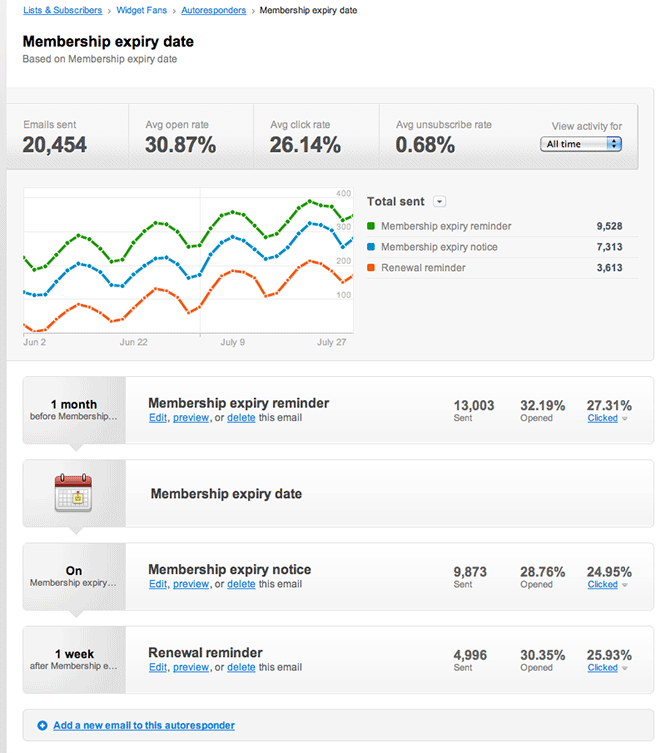
Now that your autoresponder is running, reports will be generated for you automatically. At the top of the main autoresponder page are summary statistics, and a graph showing an overview of emails sent over time.
Then for each email in the series, you can see the number of emails sent and the percentages for opens and clicks. You can drill down further to see which specific links are being clicked.
Notice that you can interact with the drop down menu on the graph to show Opens, Sent, Clicks or Unsubscribes for all of the emails in your series.
If you cant find the information you are looking for then give us a call. Our team are always on-hand to answer your questions and turn you into an email marketing guru.
Packages start from £10/month or pay as you go
+44 (0)1484 90 50 13 | support@id30email.com