Support
Browse our range of help documentation and guides.
Browse our range of help documentation and guides.
Looking for an instant answer to a question? Chances are we've been asked it before and it's answered here. Just dive into a category your question relates to below.
We allow you to personalize the subject line and content for each campaign you send. By adding any of the following tags to your campaign content, we will dynamically change these values for every recipient when sending the campaign. You could even add the name tags to the subject line of your email for a more personal approach.
First Name (everything up to the first space character) - [firstname,fallback=customer]
Last Name (everything after the last space character) - [lastname,fallback=customer]
Full Name - [fullname,fallback=customer]
Email Address - [email]
When personalizing a recipient's name, you can provide a fallback value which is displayed if that field is empty for that recipient. If you would like nothing displayed when a recipient's name field is empty, simply leave the fallback value blank (e.g. [firstname,fallback=]).
The fallback term can be any plain text word or phrase, but it isn't possible to use a custom field value there.
As well as personalizing your campaigns with variations of name and email address, you can also add any custom fields you might have set up for a subscriber list.
When adding a custom field, you can specify a personalization tag for that field. Whenever you add these tags to a campaign and send it to that list, those fields will be populated with each subscriber's information.
![]()
Just like name and email address, you can provide your own fallback terms for these custom fields, using the same fallback code (e.g. [address,fallback=]).
Once you have the tags inserted into your document, you will want to send yourself a test and see them in action. Make sure you have got your campaign setup, and have defined the recipient list that includes the relevant custom fields.
Then, when you get to Step 4.1 Test your campaign you will see that you can choose to send a personalized version of your email to any address. The personalization tags will be filled out using the details of a random subscriber from your list, so you can see the email exactly as they will when you send the campaign.

You can also choose to test the fallback terms, which is what any subscriber who does not have a value set for that field would see.
When you send a preview, and click through to the web version, you will only see the fallback terms, not any specific custom data. That's because the preview web version is generic and not specific to any subscriber. However, when you send your real campaign, each subscriber will see their own customized web version link, which will open the web version with their own personalization in it.
The generic web version with fallback terms is also what you will get if you use the "Share" link from your campaign reports.
Unfortunately, no. Our system has been specifically built not to support attachments. We did this for a number of reasons.
If you have a file that you'd like to give to your customers, we recommend that you host the file on your own server and then place a link to the file within your email. This also means you won't clog your subscriber's inbox with attachments they may not even use.
Here's a quick example of how you might promote a PDF document in their email instead of actually attaching it.

Alternately, you can consider using a file hosting service like Digioh, which provides a share URL that you can use to link to the file from your campaign.
It is simple to add links to your email campaigns that let your subscribers share your email with their friends and followers. You can also share your campaign yourself at any time after you send it out.
As soon as you have sent your campaign, you'll see an option to share a URL for your campaign via Facebook or Twitter (or to just copy and send that URL wherever you'd like). This is a simple way to notify your Twitter followers and Facebook friends of your latest email. This share option is always available from the top right of the report page.
Click the 'Share' button and you'll see a window popup with the short URL as well as the Facebook and Twitter buttons.

The short URL will always be at createsend.com (it isn't possible to change that), but even if Twitter or another of the major URL shortening services changes the URL, it can still be tracked in your social report.
When you setup a new campaign, you can choose to run a standard campaign, where every recipient receives exactly the same email, or an A/B campaign. This page explains more about what A/B testing is, why you might use it and how it all works.
A/B testing (also called split testing) is a way of working out which of two different options will be the most effective. When used for your email campaigns, that means A/B testing can help you decide which email will the best one to send to your subscriber list from two different options which are labeled A and B.
The basic idea is that you send Version A to a small number of your subscribers, and Version B to another small group. The results (opens or clicks) are measured, and a winner is chosen. Then that winning version is sent out to all the remaining subscribers.
A/B testing offers a simple way for you to get the most opens and clicks from your campaigns. With A/B testing you could:
As well as comparing as many other variables as you can think of. Since A/B testing is built right into your account, it's really easy to do. For any campaign, there are three different areas you can test. The subject line, the 'from' name and email address and the actual email content itself.
1) Subject line test
Taking a small subset of your recipients, say 20%, you'll send half an email with one subject line, and the other half a different subject line. Then you can watch the results come in for as long or as short a time as you feel comfortable with. Once you know which one performs the best, you send the email, with that winning subject line in place, to the remaining 80% of your subscribers.
2) Email content test
You'll create two different emails to test and send them both to a subset of your recipients. Then (automatically or manually) the winning version is sent to the rest of your recipients. You could have only slight design differences, or something more major, depending on what you want to test.
3) From name and from email test
In this test, the content and the subject are the same for each email, and only the 'from' name and the 'from' address differ. Which ever gains the most opens or clicks (at your choice) wins, and is sent to the rest of the list.
When you create a new campaign, you have two options, regular campaign or A/B split campaign.

Click the A/B tab to show your A/B testing options.

Depending on which option you chose, you'll see some extra fields appear (to enter your alternate subject or 'from' details). If you chose to A/B test email content, you will get an extra step when defining the content for your campaign.
Instead of just importing once, you go through the import process twice, once for version A and once for version B.

Select your subscriber lists as normal, and you'll move on to finalize the settings for your test. At this last step, you get to decide how many people get Version A and Version B, and how many receive the winning version.
Use the slider to set the sizes of each group. You also define how the winner is selected, whether it is from most opens, most unique clicks, or the most clicks on a specific link in your email.
Finally, you'll need to select how long to wait before deciding the winner (from one hour up to several days). Keep in mind that you can always manually declare a winner at any time by visiting the reports.

Once that is all done, you can send yourself tests of both versions, and then fire off your campaign as normal.
If, at the end of the A/B test, the two versions are tied, version A will be sent to the rest of the list.
While your A/B test is running (before the time period you set expires, or you manually declare a winner) there is a special A/B test report you will see. It looks like this:

You can easily see which version is performing better according to the measurement you chose, and you can also see the time remaining for the test. Notice the link in the top right to manually choose a winner.
You might choose to do that if one version is clearly better, so you don't have to wait for time to run out. That's all there is to it!
Once your winner has been decided, the remaining recipients will receive the winning version and you'll be able to see your normal campaign reports. You can still access the A/B results too, in case you want to revisit them when designing your next campaign.
Important: Once you start the A/B test, you won't be able to change anything about the campaign, so be sure to test thoroughly before kicking of your campaign! In addition, any email addresses you add into your list after you start the A/B test will not be included in either version A or B, so those recently added individuals will need to be targeted separately.

In a promising move, some email clients are building phishing detection right into the software itself. Phishing basically refers to an email that fraudulently tries to get information off someone by pretending to be someone else. I'm sure that like me, most of you have received a few PayPal phishing scams in your time.
Both Mozilla Thunderbird and AOL 9.0 now feature phishing scam detection that will impact on how you design your email creative. To determine if an email may be a phishing scam, the email client looks for a link in your HTML campaign where the display text is a URL. If the displayed link is different from the actual URL, the user is alerted.
Remember, we change every link in your HTML campaigns so we can track link clicks for you. This means that even when you have a link like:
<a href="http://www.yoursite.com">http://www.yoursite.com</a>We'll change that to something like:
<a href="http://yourname.cmailx.com/.aspx/l/14202/0/www.yoursite.com"> http://www.yoursite.com</a>This change will mean that your email may get flagged as a phishing scam.
To ensure you never look like a phisher, avoid using a URL as the display text for a link in any HTML emails. Instead, try and use a word or phrase which describes the link itself. Such as:
<a href="http://www.yoursite.com">Visit our website</a>Even though we'll change that to something like:
<a href="http://yourname.cilx.com/.aspx/l/14202/0/www.yoursite.com"> Visit our website</a>You won't ever be identified as a potential phishing scammer.
When you are creating your email campaign, you'll see it in a browser preview. Once you send it out though, that same email will be viewed in any number of different ways.
Desktop email applications like Outlook or Apple Mail, web based email like Gmail and Hotmail and increasingly on mobile phones and devices like the iPad.
Your email could look quite different in an email client than it does in a browser, and display differently in Outlook than it does in Gmail. To further complicate things, some web based email programs actually work differently depending on the browser you access them through.
The kinds of differences you might see include padding and margin changes, spacing between elements, background images not showing up, CSS being ignored and much more.
So it is important that you check to make sure your email is readable and appealing on as many email clients as you can. That's not to say it should look identical, but it should be usable.
The very minimum you should do is make use of the built in 'send a test email' function to view the email in your own email program.
You can access this when setting up an email campaign. After you've selected the recipient list for the campaign, you'll reach Step 4.1 - Test your campaign.
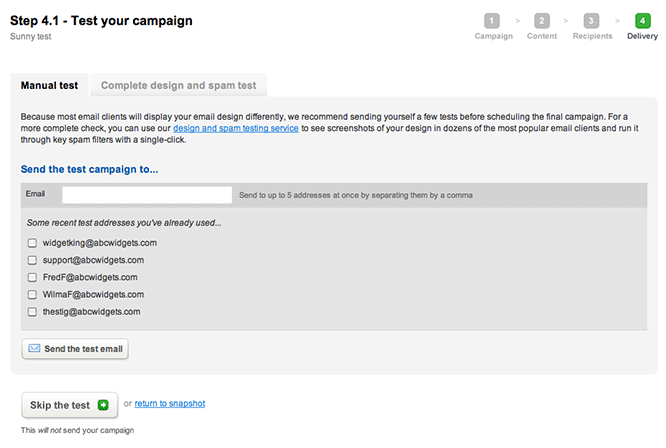
You'll see that the default tab selected is 'Manual Test'. Here you can enter up to 5 email addresses, and send a copy of your campaign to them all at once.
This is perfect for quickly checking your campaign in the email programs you have available. Setup a free Gmail and Yahoo! account, for example, and use those. The last 5 addresses you tested with will be remembered for next time.
For a more thorough test, you can optionally choose to run a 'Complete design and spam test' which is the other tab on the page, if it is accessible to you.
Select that tab to view all the details, including an example of the results you can get. See screenshots of exactly how your email will look in more than 20 of the most popular desktop, web and mobile email clients like Outlook 2007, Windows Live Hotmail, Gmail, Lotus Notes, iPhone, BlackBerry and many more.
In addition, your email will be run through major spam filters to give you some idea of how they will treat your campaign once it has been sent.
Make sure you have got your campaign setup, and have defined the recipient list that includes the relevant custom fields.
Then, when you get to Step 4.1 Test your campaign you will see that you can now choose to send a personalized version of your email to any address. The personalization tags will be filled out using the details of a random subscriber from your list, so you can see the email exactly as they will when you send the campaign.

You can also choose to test the fallback terms, which is what any subscriber who does not have a value set for that field would see.
Why is it that sometimes you send a test message from the application to yourself or other team members in your company, and it doesn't arrive? Well, most of the time the email does arrive, but is filtered into a junk folder, or just takes a few minutes.
Sometimes though, it just never seems to get there. It can be incredibly frustrating, and worrying because you may think your own customers won't get your emails either. The system is sending them out - where are they going?
The problem occurs when you are sending an email from the system to yourself, but defining the 'from' address to be the same domain as the 'to' address. So from clarkk@dailyplanet.com to loisl@dailyplanet.com for example. Some mail servers have built in brains that try to stop spam by checking for emails that claim to have been sent from the same domain as they are being sent to.
So the Daily Planet's email server might say:
This email for Lois says it is from Clark, but I didn't send any emails for Clark, so this must be a dastardly fake.
The email is stopped by the mail server, and never delivered or bounced back. The sending tool can't tell that is what happened, because no bounce message is sent. This problem will not affect your customers at all, because their email addresses are not at the same domain as your 'from' address.
To prevent this problem, you just need to get your mail server administrator to specifically let emails from the email tool come through. Sometimes this is called 'whitelisting'. They will need to know the IP Addresses we send from.
Another helpful hint, since sometimes it's your server's spam filter getting in the way, is to not only check your spam folders but also try adjusting the blocks of text to see if any particular paragraph or set of words is causing the filter to be tripped.
Then you will be able to receive your test emails and make sure everything is perfect before sending out your campaign, always a good idea.
You can easily re-use a campaign you have already sent out to a subscriber list via the 'edit and resend' function. You'll find 'edit and resend' in the sub-navigation under the 'Create/Send' tab in your account.
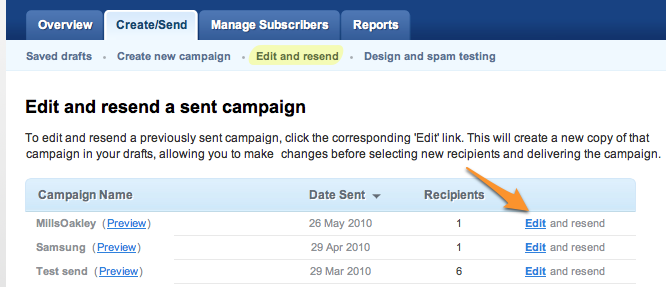
Once you click 'edit and resend' you will see a list of all your previously sent campaigns, with an Edit link for each one. Click that for the campaign you want to resend.
The campaign is then duplicated for you, and the copy is placed into your drafts, where you can make changes to it before sending it to any of your subscriber lists. Don't worry, this won't affect the campaign you already sent or the reports for that campaign in any way. It is just a quick way to recreate a campaign instead of having to start a new one.
If you've had a few people signup just after you sent your campaign, you can use this 'edit and resend' function to send them a copy. It will be created as a separate campaign, so there will be separate reports for it, but it is a nice way of ensuring people don't have to wait too long for an email.
You can use segmenting to quickly create a list of people who signed up after a certain date (for example, the date you sent the last email).
No. We automatically take care of this issue. We realize that it could be very likely that your subscribers might be interested in subscribing to more than one of your lists and because of this, when you send one campaign that targets multiple Subscriber Lists, we automatically prevent delivery duplication for that campaign.
If the recipient (who appears across more than one list you are sending to) unsubscribes, they will be removed from each list you sent to that they appear in.
If you were to send to each Subscriber List separately, we are unable to determine that there are duplicates. Subscribers in more than one of these Subscriber Lists would get multiple campaigns in their inbox.
Definitely not! Your campaign might have been added to our delivery queue right after a number of larger campaigns and it may have to wait for those campaigns to be delivered first. Head into the Reports section of your account and if your campaign is still listed as Currently Sending, then it will be sent out soon.

We'll send you an email as soon as the last email is sent and you can start viewing your reports on the results. If you re-send the campaign while the current one is waiting to send, your recipients will receive 2 copies of your email.
We're constantly evaluating our delivery server queues and add new mail servers to our cluster from time to time to ensure we get your campaigns sent as quickly as possible.
If you have waited more than an hour and your campaign is still listed as Currently Sending, please get in touch with us.
We take care of this for you by permanently removing the subscriber from your account automatically. This is a standard industry practice and it saves you from accidentally adding this subscriber to your list and inviting another spam complaint.
In the final stage of creating a campaign, you must decide if you would like the campaign to be sent immediately, or have it scheduled for a specific time in the future. If the schedule option is selected, you will need to specify the delivery time by providing the date , time , and time zone you wish to send in.
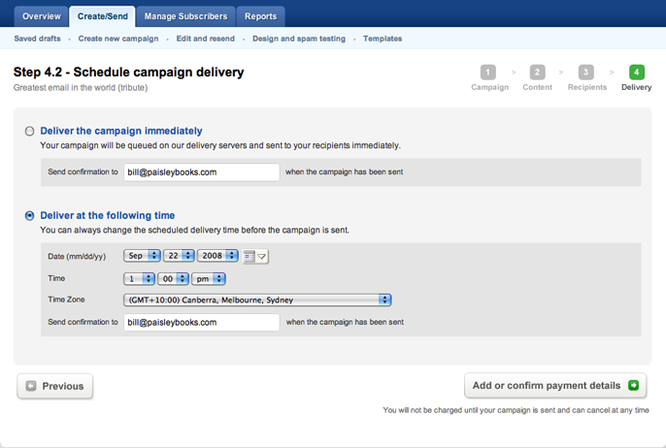
If you are scheduling a large campaign that requires payment, your credit card will not be charged until the campaign is actually delivered . This means that if you cancel the scheduled campaign before delivery, you will not be charged.
Yes, your campaign will go to whoever is on the lists at the time of sending. That does mean the amount we charge you could be slightly more (or less) than the amount shown when you set it up, but it ensures everyone who is interested gets the email.
Every email you send should have a plain text alternative available for your readers to use. It is quick and easy to do, but easily overlooked. Here are the most common questions about creating and editing plain text emails.
Some people just don’t like HTML in their emails. They might be using older systems, or their system is locked down and they just can’t view HTML. Other people prefer plain text for accessibility reasons, or to make their email system run faster.
You should provide a plain text alternative to every email, so that the reader’s own email server or program can choose which version to display, giving control to your reader instead of yourself.
If you choose to create a campaign that is text only, then it is easy - you type into the text box that will come up after you've setup the campaign. If you've selected to send HTML and plain text, you will be shown the same text box after you have imported your HTML content during the campaign creation process.
For campaigns based on a template, the process is a little different. After using the WYSIWYG editor to add all your text content, you'll see the campaign snapshot. Under the 'Content' header will be HTML and Text lines. Click 'Update' next to the text label to jump into the text editing page.
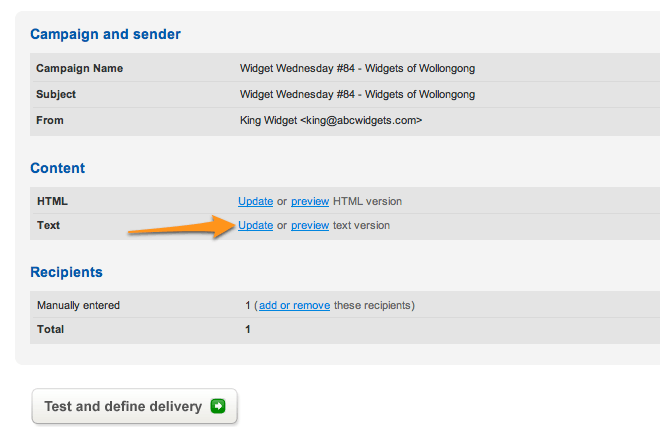
You can then type in or paste in your plain text content. Use the softwares built in 'import it from your HTML' feature to save you some time by creating an automatic plain text version of your HTML content.
This feature is accessed via a link at the top of the text entry box, and only takes a moment to work. It will strip out the text content from your HTML version and try to make some intelligent guesses about how it should be ordered, and what it should look like.
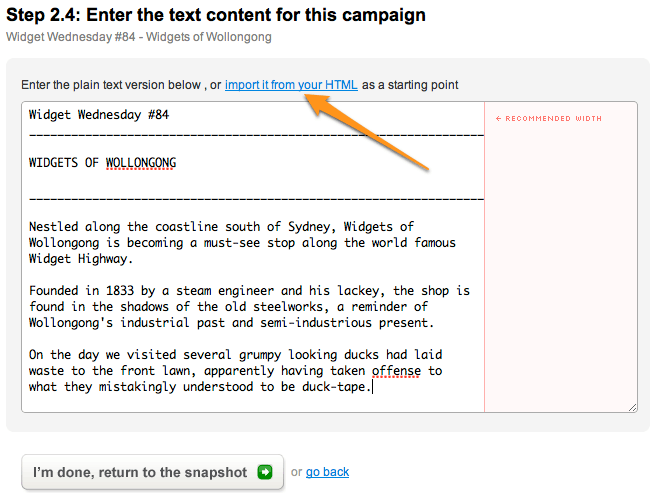
You'll almost always want to make your own changes, because you can make smarter decisions about what is important in the text version and what is not.
Don't forget: If you make changes to the HTML version later, you'll need to come back to the plain text and edit it too.
No, sorry. The nature of plain text is that it is purely text, no formatting or images at all. You just type in your text, and that's it. There is no reason you can't do a very simple HTML email that only contains text, or just text and a logo, but you still need a true plain text alternative in place.
It isn't something you can do, sorry. Links are part of the HTML markup, and plain text doesn't have any HTML in it. However, many email clients will automatically detect URLs in plain text and make them clickable. Keep in mind that there is no tracking of plain text link clicks, so they won't show up in your reports.
Since plain text can't have hyperlinks, there is a separate unsubscribe tag just for the text version. It is [unsubscribe]. That tag will be replaced with just the unsubscribe URL, so you would want to have an introductory sentence before the tag, as in:
If you are no longer interested, you can unsubscribe instantly here: [unsubscribe]
This is especially important if your email is not in English, because the default unsubscribe link will be added for you if you don't have one. It is included along with an English language introduction, which will confuse any reader who is viewing the plain text version.
So make sure to include an unsubscribe sentence and tag in your own language before saving.
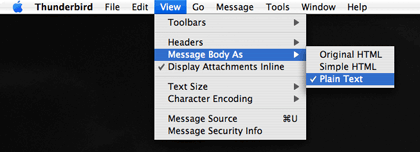
When you create a campaign, you can select to send it in plain text or multipart text+html formats. Testing an email that is just text is pretty straightforward, and testing the html portion is also easy, but how do you see the plain text part of a multipart email? Here's how to check what people will see if their email client is setup to show text only.
Thunderbird is a cross platform, free email client, and it lets you easily view the plain text version of a multipart email.
View > Message Body As > Plain Text
Apple Mail has the same functionality built in:
View > Message > Plain Text Alternative
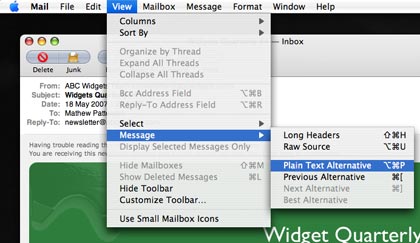
In both clients, you can swap back and forth between html and text views.
No, it isn't possible in the plain text version to have anything except plain old text characters. That means you can't make links active, or make your text bold or include a logo.
That's because plain text is a format that is the common denominator for even the oldest email clients, and it doesn't have any markup capabilities at all.
However, many modern email clients will detect URLs in plain text and automatically make them links for your subscribers to click on.
If your email is just text with a couple of links and a logo, you could create a very simple HTML version that formats your fonts for you, and lets you add an image and a link or two but still looks like a text document. You'd still need to include a real plain text version without any of that markup though, for people who can't view the HTML.
If you cant find the information you are looking for then give us a call. Our team are always on-hand to answer your questions and turn you into an email marketing guru.
Packages start from £10/month or pay as you go